

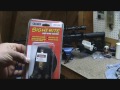
- MidTen Bore Sight Cal 223 5.56mm Rem Gauge with Two Sets of Batteries
- GLORYFIRE Universal Gun Cleaning Kit
- Allen Ammo Pouch for Rifles, 14 Cartridge Loops
- MTM 20 Round Slip-Top Magnum Rifle Ammo Box
- MTM H50-R-MAG Deluxe 50-Round Rifle Ammo Box
- SSI Sight-Rite Bullet Laser Bore Sighter
- Mizugiwa Rifle Belt Ammo Carrier Pouch
- MAYMOC Bore Sight Laser Red Dot in-Chamber Cartridge
- BRONZEDOG Leather Cartridge Case Shell Holder
TOP #1 
MidTen Bore Sight Cal 223 5.56mm Rem Gauge with Two Sets of Batteries ammo for 300 win mag
|
TOP #2 
GLORYFIRE Universal Gun Cleaning Kit ammo for 300 win mag
|
TOP #3 
Allen Ammo Pouch for Rifles, 14 Cartridge Loops ammo for 300 win mag
|
TOP #4 
MTM 20 Round Slip-Top Magnum Rifle Ammo Box ammo for 300 win mag
|
TOP #5 
MTM H50-R-MAG Deluxe 50-Round Rifle Ammo Box ammo for 300 win mag
|
TOP #6 
SSI Sight-Rite Bullet Laser Bore Sighter ammo for 300 win mag
|
TOP #7 
Mizugiwa Rifle Belt Ammo Carrier Pouch ammo for 300 win mag
|
TOP #8 
MAYMOC Bore Sight Laser Red Dot in-Chamber Cartridge ammo for 300 win mag
|
TOP #9 
BRONZEDOG Leather Cartridge Case Shell Holder ammo for 300 win mag
|
MidTen Bore Sight Cal 223 5.56mm Rem Gauge with Two Sets of Batteries ammo for 300 win mag


Specification
— Length: 44.5mm; Tail width: 9.5mm; Head width: 6.3mm
— Laser Wave length (nm:) 640 to 660
— LED Type: visible red laser
— Power: <5 mW
— Construction: Brass
— Sighting Range: 15 to 100 yards
— Dot Size: 2 inches at 100 yards
— Operation: On/Off End Cap
— Temperature: -10℃ to 40℃
— Battery Type:6 X AG3 (Included)
How to use the bore sight?
1.Unscrew the back cap from the bore sight by turning counter clockwise
2.Stand the bore sight on a flat surface with the laser side pointing down
3.Insert batteries (+ side up) inside the rear opening
4.Carefully push down and turn the screw cap clockwise to tighten the cap (the laser is now on)
5.Place in your rifle’s chamber and close the bolt
6.To remove – open the bolt if it does not automatically extract, manually remove the unit by tilting the rifle’s barrel upward (always practicing safe firearm practices)
7.Unscrew the back and remove the batteries to turn the unit off
Package included
— 1 X Bore Sight
— 6 X AG3/LR41 Batteries
- Class IIIA laser, less than 5mW
- Made to fit the .223 chamber, caliber specific.
- Comes with 2 sets of UPDATED batteries (6 AG3 batteries) which can last one and half an hour.
- Easy to sit perfectly in the bore. Sturdy brass construction. Fast gun zeroing and sighting.
- High accuracy to reduce cartridges and shells wasted, sighting range of the boresight is 15 to 100 yards.
- ammo for 300 win mag
- Package Dimensions: 2.8 x 2.2 x 0.3 inches; 0.63 Ounces
- Batteries: 6 Lithium Metal batteries required. (included)
- Manufacturer: yawan
- Type: ammo for 300 win mag
GLORYFIRE Universal Gun Cleaning Kit ammo for 300 win mag


- Universal Gun Cleaning Kit: This durable case can be used to clean all types of guns. All the accessories you need to clean the gun are in this case. The box is marked with the scale and can be placed back in the correct position after use. No matter you are a beginner or a professional shooter, this cleaning kit is perfect for you.
- Carrying Case Design: All the materials you need are in a lightweight durable plastic suitcase. Every gun cleaning accessory you need is neatly placed in their own compartment, it also provides 2 spaces for you to place the cleaning oil and solvent. Keep your guns performing at their best by utilizing this cleaning kit. You can take it with you wherever you go!
- High Quality Deluxe Gun Cleaning Set: All our slotted loops and cleaning jags are made of high quality CNC Precision Machined slotted solid brass. Sets from other brands use cheap plastic tips that can easily break in a short time. With this set of CNC Precision Machined slotted solid brass tips, you will not experience the frustration of having a broken tip inside your gun barrel forever. The thin rods has been strengthened and is not easily broken even in great pressure.
- Gun Cleaning Accessories: 3 solid brass rods for 17-270 caliber guns; 3 solid brass rods for 30 caliber pistols, shotguns and muzzleloaders; In addition the Universal Gun Cleaning Kit also has 14 brushes; 9 mops; 13 spear-pointed jags; 4 slotted patch loops; 3 utility brushes; 3 muzzle guards; 3 accessory adapters; 50 3×3″ cleaning patches and 4 polishing clothes,2 empty bottles.
- Some of the accessories are consumable, so we prepare multiple accessories in our California warehouse. If you have any problems while using, please contact us, we’ll be glad to help you.
- ammo for 300 win mag
- Manufacturer: GLORYFIRE
- Type: ammo for 300 win mag
Chase- and this is all things random today- we are talking about- you- can get for your gun lover this christmas. Now, why am I doing this video? We are nine days until christmas and just enough time to still do some last minute shopping, especially on places like amazon, which is exactly where I picked this up and I’m going to leave a link down below now.
What am I talking about today today? I’m talking about the glory fire universal gun, cleaning kit. Now the reason why I am doing a review on this is because, when I came across it I can be honest with you a lot of issues that I have when it comes to getting gifts for people that I care about. My father, father-in-law, friends, brother-in-law, everybody are they’re all gun, guys right, everybody likes to go out to the range I live here in alaska, so it makes a lot of sense.
But normally, when you have guns, you have to buy a cleaning kit for every single gun. You know. If I have pistols, I have to buy a pistol cleaning kit. If I have a shotgun, I have to buy a shotgun cleaning kit same thing with a rifle and it just gets cumbersome, and you have all this stuff in a specific area. Well, this year you can actually get something for someone that they’ll actually use.
Now, let’s take a look at this thing: okay, the glory fire universal gun cleaning kit now inside it has a lot of stuff. This thing basically will clean any gun that you have in your arsenal, so we’re gonna dive into all the details about this, and I’m gonna show you everything that it comes with okay. So let’s take a look at everything that comes in here and why? I think this is a pretty great deal well, like I said before.
Basically, this is a universal kit for everything it doesn’t matter. What kind of gun you have. This is going to clean it. In fact, it even has a 50 caliber jack in here. In case you have a very large rifle. So let’s go over exactly what comes in here so already. You can see that it has basic brass rods, because this is a push rod. Cleaning kit, there are two types of cleaning kits that I’m aware of.
There’s push and pull pull would be a cleaning kit that normally has a rope. Has a brass end: you slot it down the barrel, then you pull it out in the direction of the bullet. Push rods are basically the same thing except you start from the bullet end or the chamber. You push down through the barrel, and then you end up having to pull back. So you get a sort of double pass when you’re cleaning through the barrel.
Some people agree with that. Some people don’t agree with that. I can tell you that push rod systems are just fine. In fact, the one thing that I really like about this and I’ll give you an example of something like a walmart cleaning kit right, you get a walmart cleaning kit, something for pistols. The push rods are extremely thin. This thing literally weighs probably five times as much as a rod from uh one of the cheaper cleaning kits that already cost you like 15 bucks.
If you go to walmart or you go to sportsman’s, warehouse or cabela’s, so, and I have cleaning kits from those places- and I can tell you that this thing literally feels like like it just- has a lot of heft to it. I think this is four or five times thicker than the standard brass rod. That’s already a positive thing for me and there’s multiple different ones.
You have the thinner ones for the thinner rifles and the thicker ones for the larger rifles or the larger bore when it comes to pistols, rifles or shotguns, so that is already a huge plus for me. I really enjoy seeing that because it just shows that it has quality. Another thing that I read when I was looking into this kit is the fact that everything they use is milled out of solid brass.
All the jacks here are milled a solid brass. All the loops are milled out of a piece of solid brass everything that they have here when it comes to, like the actual brass, is milled out of solid pieces of brass. You don’t see that too often, mostly, they do casting. Now. In the kit you get both your bore brushes and you get boar mops. These are for cleaning.
These are mostly for drying and lubricating. It also comes with, I think, 100 or 200 patches, and it has multiple different brushes now. This is something that I’m very happy with. Also when I go and I get a cheaper cleaning kit, they normally don’t come with brushes. I normally have to get like a toothbrush or an old toothbrush. Anybody who cleans guns know that everybody has an old toothbrush to help clean their gun.
Well, this not only has brass, but it also has nylon and it has iron now the re there’s a reason for each one of them. Now, when you have a gun, you want something like brass, because brass is a very soft metal, so you can use brass when cleaning the barrel when cleaning the inside of the gun- and this is not going to scratch the steel that the gun is made out of now, that is a rule of thumb and I’ll get into a negative about the kit about something they they also sent as an extra that sort of is a is a pro and a con because of the metal it’s made out of now brass itself, again softer metal.
So you can use this to clean any part of the gun, except like the composite body, and it won’t scratch it now clean the composite body, clearly you’re going to want to use the nylon brush now. Also, if you look at something like an iron brush, this can be used to clean parts like the the bolt carrier group of your ar-15, really good, really high quality really happy to see that, in fact, I haven’t even owned a iron or brass brush and I’ve never used them.
Since I got out of the military, and not only was I in the military and a precision shooter in the military, but I’m a police officer and even at the department, we don’t have steel brushes, we have nylon brushes, but we don’t have iron or brass. I said steel, it’s iron and brass, so that to me is a huge positive thing that it comes in this kit. So let’s take a quick look at the calipers 243 22.
These are rifles. Then you go into the pistols, 45 49 back into the rifles all the way down to a point, two: zero, a point, one: seven! So actually you can clean a bb gun with these 270 30 410 50 cal 54 20 gauge shotgun 12 gauge now. This also includes the mop sizes, too. You have a small down as a bb gun, a point, one seven, which is a 177 for a bb gun or a pellet gun all the way up to a 12 gauge in the mops moving down.
They do offer bottles here for both solvent and lubricant. You can put whatever you want in here, it’s nice to see, and this space is large enough, that you don’t have to fill these bottles up with solvent or with lubricant, but you can literally just put a standard bottle of lubricant or solvent right here that you would get from a sportsman’s place or, like I said, walmart, so it’s nice to see that they have big enough space there, that you don’t necessarily have to use the bottles they have.
However, one of the things is, it does have a sort of steel tip. So if you’re lubricating, you know in precision spots, let’s just say I have a subcompact semi-automatic, handgun flip the slide over and start lubing, like you know, in the slide in specific spots um, it’s nice that these are like precision same thing with the solvent. The solvent necessarily doesn’t need to be precision.
You basically just throw solvent on it, clean it off, and then you lube it afterward. Now let me show you the additional stuff that they sent now. They also sent a bunch of cleaning q-tips. Basically, these are great. I think, there’s a hundred in here. These are great because, when you get into small spaces, it’s nice that these right here you can see are like arrow-tipped.
So basically, you can get in and clean every little detail every spot into the nook and crannies. Now that’s important. Some people would say: oh you can just field strip a gun. You really don’t have to detail clean it. Well, I can tell you that I carry a gun for a living and I want my gun to be clean and operational and well lubed. One of the other things they sent is these plastic picks.
Now the plastic picks are fine. Now one of the things you would use a pick for is to get a lot of carbon off of things like your bolt carrier group. If you go out and shoot something like a rifle or an ar-15, a semi-automatic rifle for a long period of time. Now in the military we used to use picks because we’d want to get in and get literally all the carbon off.
The bulk carrier group on the inside of the chamber. Everything now plastic is fine. The problem with plastic: is it really doesn’t hold up very well now you can use this and it’s going to get some, but it’s really not going to get the hard stubborn stuff. Now you can put some solvent on it and then come back through with the plastic and that’s fine.
Now it’s great that they offer these. You know, but still plastic. It really doesn’t do much for cleaning a gun, but it’s still better than having none at all. So it’s nice that they at least added these as an extra, because you can still use them to get dirt out to get dust out. One of the things that I know happens in a lot of places is it’s muggy dusty.
When you have dust and you have moisture in the air, you actually create like a thin layer of silt and mud on the outside of your gun, and this is actually good to clean it off the last thing they sent, which is great and bad. At the same time now they they sent a stainless steel pick now a stainless steel pick is fine, but when you’re cleaning a steel gun with a steel barrel, you don’t want to use a steel pick.
It’s going to end up scratching the surface, which I it’s arguable that it’s a bad thing. You know they say that if you scratch the surface of steel, sometimes it helps promote oxidation and then later rust. But if you keep your gun well oiled that shouldn’t happen, but you know I like the fact that they did send this as an extra, but I wish it was not made of steel.
I wish it was not a steel pick. I wish it was something like a brass pick, because you know, then I don’t have to worry about it. Like really scratching up my gun. This is still good to use for those hard carbon places. Um those those this stuff where carbon can really get in an example, would be your gas blowback tube on your ar-15. This is actually nice for that, because you’re not really worried about scratching that you just want to be able to clear out the carbon.
Let’s do a serious pros and cons of this kit and why you should, or shouldn’t buy it now, I’m not here to blow smoke. I’m here to sort of give you a little bit of my experience why I would or wouldn’t purchase this kit for me or someone else. Well, I can tell you that one. This has everything in it. This is everything that you would need to clean a gun, minus the solution and minus the oil.
But a lot of places can’t ship solvent in the mail, not really a big deal. You can basically pick it up at any sports store, so that to me is really not a big deal. The plastic picks really aren’t a big deal for me. It’s not a deal breaker for me, because these are extra. These don’t even come in the kit, and neither does the stainless steel pick.
That’s just an extra that they add on when you order the item on amazon. Now, what do I like about this kit? Well, I, like the brass rods. These things are super thick. If anybody knows anything about cleaning guns, especially rifles when you have multiple brass rods put together that the longer it gets and the more you end up pushing this through the end of a barrel, the more likely it is to bend as you’re pushing it through the more likely it is to bend.
I’m telling you this thing is super thick and heavy. This is heavy duty. In fact, I can see myself like swordplaying with my kid with this, because it’s so heavy duty, I’m not going to do that. But if you understand what I’m saying like this thing is heavy duty, I’m not worried about this bending or anything else. So I’m really happy that the use solid sturdy construction again, four or five times thicker than the average than the average uh brass rod that I have in my garage.
I don’t even know where the stuff is in my garage, because, literally literally, the problem with buying individual kits is, if you don’t buy something to put it all in. So, let’s just talk about pricing, real quick, so this is like 50 bucks and it gives you everything that you would need. Well, if I go out and I go to the cheapest place, I can find which is walmart and I buy a pistol cleaning kit.
It’s going to cost me 10 to 15, then I’m gonna have all this loose stuff, that’s hanging around! Now, if I’m like hey, I need to clean my shotgun. Well, I need to go, buy a specific shotgun cleaning kit. Well, that’s going to be another 10 or 15 dollars already, I’m at 30 bucks, we’ll just say and we’re with less quality things now that stuff is also just laying around getting lost.
Now I need to clean my rifle now. I need to go: buy a specific caliber rifle kit. I can get a small caliber rifle kit or a large caliber rifle kit. It really depends on what I’m shooting it’s not all-encompassing. If I had a 50 caliber rifle, I have to go specifically buy a kit for a 50 caliber rifle, whereas this thing even has a jag, a solid brass, jack, 450 caliber, which I don’t ever need.
I don’t ever see myself getting a 50 caliber rifle, but if I did, I would be able to clean it with this, so I’d have to buy all these little cleaning kits just to be able to clean the few guns that I have, and I’m already over 50 bucks ordering all these little things and then having to find a centralized place, a bag or some sort of tote. To put it all in, it’s not nicely laid out for me, there’s not a spot for everything, it’s literally everything thrown in a bag and that’s sort of how it is that’s how most people treat their cleaning stuff.
But it’s nice that you have this. You have a kit that you can take with you out to the range you can clean out the range you can clean it home, it’s all encompassing it has everything that you would need, and it’s high quality stuff. Now the one thing that I also like is that it has shotgun stuff. Now I am a police officer and as a police officer, I can tell you that I have a 870 shotgun.
I have an ar-15 or an m4 and I have a nine millimeter pistol. I also have a 40 caliber pistol that was issued to me, and I also have a sub compact handgun to conceal, carry when I’m off duty. Now a lot of states have concealed carry laws and you can conceal carry as a civilian every day now I have a faithful belief that every job has a tool. I’m not going to build a house with a screwdriver, I’m going to build a house with a hammer, nails or a high torque drill and screws right, I’m not going to build it with screws and a screwdriver that just doesn’t make any sense.
Every job needs a specific tool, which is why I always tell people you should have a shotgun for home defense. You have a sub compact gun to conceal, carry if you wish, you should have a full-size, semi-automatic, handgun and a rifle. If you want to do hunting or target shooting or some sort of long-range shooting well, if you have those guns, this kit will clean all those guns.
It’s actually nice that there is a company, that’s willing to offer everything. That’s high quality for 50 bucks on amazon that I can get shipped to my house, and I can pack it up and take it right to the range and everything’s here. I don’t have to worry about losing anything or misplacing anything. The moment I’m done cleaning or if I need to do something else, I put it right back in its place.
I think that if you’re going to buy a gift for someone this year, who is a gun guy or is a hunter or something like this? You cannot go wrong. Getting something like this and again. Chris is around the corner. You don’t just want to waste your money, a nonsense. Now this is just an overview of the cleaning kit itself. If you guys want to know how to clean guns, a lot of people look on youtube because they’ll purchase their first gun.
They really don’t know how to take care of it. They don’t know how to clean it. Well, if you guys are interested in something like that, leave a comment down below and if I get enough comments, maybe I’ll do a video on how to clean a shotgun, a rifle and a pistol. Now, if you like videos and videos like this hit, that subscribe button down below leave a comment to the content, you guys would like to see on this channel.
This is all things random. I do mostly watch stuff, but I’m an avid gun guy, I believe in protection. I am a cop. I also believe in proficiency. If you have something keeping things clean, neat and tidy now I have a lot of videos coming up in the future. In fact, I’m dropping a video tomorrow so hit that notification bell, so you guys can be notified when I drop that next video until next time, you.
Allen Ammo Pouch for Rifles, 14 Cartridge Loops ammo for 300 win mag


- Holds 14 rifle cartridges securely
- Attaches to most belts
- Opens quietly with the side release closure
- Color: Black
- Stays secure all day
- ammo for 300 win mag
- Manufacturer: Allen Company
- Color: Black.
- Brand: Allen Company
- Material: Blend
- Item Dimensions LxWxH: 5 x 4.5 x 1 inches
- Item Weight: 0.17 Pounds
- Type: ammo for 300 win mag
What’s going on guys, so today I’m going to show you all this product by allen rifle cartridge holder, it holds nine rifle cartridges, I’m going to go ahead and show y’all how to put it on and do a first-hand review of how it feels putting it on. So this thing is five dollars at walmart and I’m sure you can get on amazon or anywhere else. First issue I have with it. I know it’s gonna be very tight, so I’m in the staples, so you got to remove the staples, that’s always fun! So I’m putting this on a savage 308.
This is a savage access. 308 ah come on. I got these staples in there. That’s for sure all right! Now the staples are out, so I can fray it there all right, so it doesn’t come with any instructions, but it’s pretty self-explanatory. So it’s like for me. I might actually want to take my buttstock stocking everything off. I don’t want to remove my scope, so it might be easier if I just remove everything else, let’s go ahead and remove the sling yeah.
I don’t think I can get it on. Even with that we’ll see, I might have to remove my butts out, so I have this little rubber, cheapo factory, butt stock, so go ahead and remove it real quick make this install a little bit easier, just a phillips head. I don’t know if y’all can see me one side, all right, there’s that let’s see if we can get it on now, which is a tight fit. I imagine if the wood grain would be a little bit easier, reinstall that bad one.
I know, people that work on guns right now, I’m probably cringing that I’m not using some special high dollar tool to work on my gun. I don’t have it in a holder or a vice, I’m just doing it in my garage on a trash can with the flam blue bamboo. I already said this case that I reviewed all right here. We go slide this back down and I already see a little bit of an issue. So obviously you can spin it to wherever you want, but with this gun my sling mount is a little bit in the way.
It’ll work don’t get me wrong, but it is going to be in the way just a tad bit. I could cut that. I don’t really want to put sling back on grab some 308 ammo. This is some winchester super x put a couple rounds in there. Six all right, let’s see, okay, those are gonna, be in my way, so I can flip it to the other side and have them in there. So I can just take and take those out and spin them around now and some will be upside down, but it’s the universe, the same size on both.
So what I do is taking this spin it over there’s that and it does line up okay, but it is a little big. Of course. It’s not it’s a universal, so it’s not specific to any gun. You’re gonna have that most people prefer a sling mounted holder like this allen, sling right here, so it’s really personal preference. What you want um! I don’t mind that, honestly, that’s not that bad! So what are my thoughts? It’s cheap! It’s worth it if you need extra, ammo uh, I plan to uh.
So the reason I’m doing some hunting and gun videos is because next year I plan to go on a hunting trip and we we were going to do it this year, but it’s too late in the season that I have no vacation because the baby being born. So I figured I’d start early this year. Um testing stuff out put some trail cams out that I’m gonna have some videos on uh that will relatively cheap trail cams. I figured I’d, make um some cheap trocam videos for y’all just to show quality and setup and issues or anything, and I’m gonna literally watch this area that we’re gonna be hunting for the next year and I might even pick up a bow and go early and go bow hunting instead, so be able to start a few weeks early bow hunting.
If I do that, but yeah, that’s pretty much. Why I’m just I’m just making some videos to get ready for next year, um test these products out. It gives me a year to buy stuff. I’m able to use my christmas money to buy the christmas money from my wife to buy these. Like new sling new case, you know things to make videos on for y’all uh content. I also bought my rifle this year because the deal was great uh. This is savage access, 308. It comes in 30, 6, 27, 273, 243, 270, 22 and something else um, but this gun was 329 99 with a scope at academy.
If you were to pick this gun up at dick’s, it’s 359 99 and if you go to a gun store, which I did at first, it’s 4 99 with no optic. So there you go well thanks for watching this video guys I’ll leave a link in the description below to all the products in this video um. But, honestly, it’s it’s not bad. It’s cheap! It’s easy and uh. When I go hog hunting next year, so we’re going to plan to do a summer hog hunt, probably in georgia, I might have the opportunity to do it down here in florida.
Um just depends on landowners and if they’re uh still wanting the hogs eliminated after hunting season and if that’s the case, we’re gonna do some hog hunting. This has a full round uh four round. One in the chamber capacity, so I’m going to get a the bigger mag that they sell for it and I’m also going to have extra ammo. So we can hog hunt all night. So thanks for watching guys hope you all enjoyed.
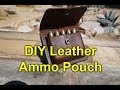
Hey there guys I’m gonna work on some more leather stuff, I, don’t know how this what videos I’m gonna, put out first, but I just got done, making a tool holder for my buddy Jake he’s a glass worker and I was thinking about had another buddy, a co-worker of mine who gave me a nice bottle of bourbon for Christmas and I’ve, been thinking about doing something for him. I wasn’t sure, and now I’ve decided I’m gonna make him an ammo holster, an ammo carrier.
So this is one I had made a couple years ago. I want to try to make something like that: pretty much the same design and either I might do a belt loop like this. With these copper rivets or this is my Leatherman holster I made this matter of a few years ago, and this one has a little metal a metal belt loop. So anyway, let me see what I can come up with I’m going to hold this over a use, wet letter to mold it over a form. So, okay, so the first step for this process of wet molding leather to make our pouch is making a form I’ve already made this form in the past.
As you can see, it’s I’ve done some ammo carriers for a couple friends in the past, but I’ve just used some standard, MDF molding I send it around here just to give it kind of a nice little thing. So basically, what I’m going to do is work the leather around here and then form it with some template pieces or just some pieces just to hold it down. I’ll clamp these in place and basically we’ll just let it sit overnight until it dries enough to take the form off.
But what at what I’m aiming to do is from a normal ammo box that has a plastic ammo carrier. This is just a little cheap plastic things. I’ve cut one side enough for five rounds. That’s the legal amount you can carry in a magazine or or a gun, so I figure. Five rounds is a good amount anyway. So I just place it right here and I figure out where I want the reveal to be so I’ve just kind of just tacked, a little bit of line there for the leather to come up about right there and then and over.
So that’s just to give me an idea. So what I’m going to do right now is grab my leather. That’s been soaking because obviously that’s kind of an important process and, as you can see, it’s the consistency of wet leather believe it or not. So anyway, what I’m going to do here is just hand mold this a little bit and I’m going to use just this little tool. You can use the end of a hammer, anything that’s that’s a wooden or plastic and smooth you can use for this, but basically I’m just going to work this and then once it’s worked, I’m going to put my form pieces on here, so I’ll show you the next step once I get these all clamped in place and then we’ll see how it looks overnight when I take the form off.
So it’s been about 20 hours as you’ll see it’s still in the mold I just kind of took those off, but you see the leather when you wet form it, it gets stretched and you’ll see that kind of curve there. That’s fine I’m gonna end up trimming that, with with an exacto knife, let me just take these off. You’ll, see, see, there’s probably still a little bit of moist spots right underneath the wood, that’s pretty much it it’s a some of this darker areas going to come out and just kind of blend in once we get the the stain on here in some of the oils and stuff.
So let me get this trimmed up and then we’ll we’ll trim up the back piece and glue them together. So you can kind of see what it’s going to look like right here, I’m just kind of trying to flare it up on the sides gives a little extra strength and kind of more of a pocket. Look so you’ll see that it’ll be a straight it’ll, be a straight line and then it’s going to flare up on the sides. Okay, so I’ve got this kind of trimmed. The way I want I’m going to set it on another piece of leather so that it can be this back flap that ends up folding over, like that, so get it right.
There I’ve already kind of traced out the lines and then what I’m going to do right here is just make sure it tapers just a little bit coming up top so that when it folds over its not looking like such a huge chunky piece of leather, so let me get this cut out and we’ll get it glued together. Okay, so this step, this is just the back panel and before we attach it to the the front of the shell carrier, we need to attach a belt loop and I got to do it now, so that I’ve got access to both sides before I stitch.
This so I’m just using copper rivets. This is an old just a scrap piece of leather when we were cutting out our other stuff and it’s just going to attach there fold over and then I’ll attach two more there with the copper rivets. So we’ve got this belt loop attached now, as you can see, just the I guess that, like a Levi’s jeans, style, copper, rivet, so basically I’m just going to rubber cement this on the rubber cement is not going to be what’s actually truly holding it for the long term.
It’s going to be the stitching, but what the rubber cement is going to do is help me basically help hold this thing together. So I can kind of finish it get the whole stitched. You know, do all that good stuff, so she’s going to be kind of a temporary bond. Okay. What I’m going to do here is use this little tool to set my my number of stitches per inch, so I’m just going to go on my edge group line just like this, and just run it back and forth and you’re going to see it’s going to make some marks all right.
Well, it now comes the scary part, because any time you die leather depending on what part of the cow or whatever animal you have leather will accept dye in different ways. Some people will say you get a wet. The leather before you put the dye on some people say: do it dry, you know what I just kind of work with what I have. This is actually some old mixed up light brown and saddle tan leather dye. I have so that’s what I have left over.
So that’s what I’m going to use for this I think it’ll turn out fine and if there’s some splotches, not a big deal, you can you’ll be able to see that I think so, and then we’ll just do some small taps to flare that out I like to kind of go in a little circle and I, don’t know if you can see that that’s a perfectly flared out and it’s actually almost flush in there. So basically that would go in there and snap just like that. Okay, so I thought the snaps were about the last thing, but I just remembered I want to put my my buddy’s initials in there just on the flap as you’ll see that’s a little darker, basically with leather, to stamp or cut or do anything any designs.
You need to have it kind of moist, so I just moistened. It up and I need to do it now, because I plan on putting some neat’s-foot oil and some other leather protectants in here in it, and it won’t take the snaps quar, the stamps, quite as quite as nicely so sucky thing with this or the tricky thing with this is making sure that you have the letters in the exact right order. So what I’ll do is I’ll just kind of set it there and kind of make sure I’m getting a little bit of an impression and just pick it up and check and I can see there.
That’s it looks good, so I’m just going to go ahead and hit this a couple times. Okay- and you can you can really set this reveal in there a little bit more if you just feel there and wait till that falls back in there, so I’m going to change the other one and do the next letter and you’ll be able to see it better once it dries. This is the last stage and arguably the hardest, unless you’re using like an awl or a machine or something like that, I’m just hand stitching it.
Just doing the the single line, double double method, basically, there’s two needles and it’s just a single line going, but your single thread going between them both and you just go through the same hole, wrap it again same hole, wrap it again, first times not too bad, but the second time you go through the hole with the other needle, it’s a little tougher, just because there’s a thread already in the hole. But anyway, once we get this done, I’m going to give it just a coat of some satin Sheen a little water-based protectant, and it should be done so we’ll see in about a minute.
Well, here’s the finished product. There’s my buddy’s initials st, as you saw before, got the little button on there. The snap works good. The ammo has a good reveal. The stitches came out pretty well, not the straightest I’ve ever done, but I think they came out. Alright I edged coated, burnished and then edged coated. The sides- I guess some true leather purists- would shriek if I said that, but a lot of people just burnish but I, like the edge coat kind of helps seal in everything.
I also did a code of neat’s-foot oil, along with a water-based sheen waterproofer to this leather and I, think it gave it kind of a nice little almost modeled or splotchy. Look and I think that kind of adds to the rugged character of it. So anyway, guys thanks for watching I hope. This was something maybe gives you an idea of something you can do.
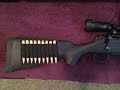
Plan this is a product review of a stock rifle cartridge, holder, purchased for one dollar and 81 cents. The only setback to this was that, in order to get it on, I had to remove the sling, as well as the scope and put it on from the barrel down. There were simply no way it was going on from the stock forward. That, however, only took about five minutes in total, including putting the sling and the scope back on the rifle for this price I, don’t consider that much of an issue the cartridges are held in place very firmly and I have no concern about them ever falling out, because there was no way to place this on the rifle from the stock forward.
It is very tight and also not going to slip or move at all. This holds a total of nine rounds, and the magazine inside the rifle holds four plus one in the chamber. So with just one additional magazine Plus. This I am able to carry a total of 18 rounds again for this price. If you own a 30 6, as shown here or a 308 or similar rifle I, don’t know why you wouldn’t consider adding this accessory to it.
This was an add-on item through Amazon. Here is the description of what an Amazon add-on item is feel free to pause. The video at this point to read this thanks for watching and feel free to subscribe to our Facebook group at the link below in the description, peace.
MTM 20 Round Slip-Top Magnum Rifle Ammo Box ammo for 300 win mag

- For: 300 Remington Ultra Mag., 300 Wby. Mag., 300 & 338 Win Winchester Mag. , 7mm Remington Mag.
- Made of clear see through polypropylene to last a long time
- “Slip-Top” series is designed to keep 20 rounds secure in jacket or shirt pocket
- Ideal for keeping special loads separate
- Lid is at 3.84″ Overall Length – Made in USA
- ammo for 300 win mag
- Package Dimensions: 1 x 1 x 1 inches; 1 Pounds
- Item model number: RS-SIZ
- Manufacturer: MTM
- Type: ammo for 300 win mag
MTM H50-R-MAG Deluxe 50-Round Rifle Ammo Box ammo for 300 win mag


- Bullet tip protection – Strong handle – Lockable
- For: 300 Wby Mag, 300 338 Win Mag, 30-30, 375 H&H Mag, 7mm Rem Mag
- Made of rugged polypropylene with scuff-resistant textured finish
- Maximum Overall Length = 3.60” bullet up and 4.3” bullet down
- Mechanical hinge – Stackable – Load label – 10 year guarantee – Made in USA
- ammo for 300 win mag
- Manufacturer: MTM
- Color: Green
- Brand: MTM
- Material: Polypropylene
- Item Dimensions LxWxH: 7 x 7 x 7 inches
- Item Weight: 0.5 Pounds
- Type: ammo for 300 win mag
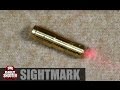
SSI Sight-Rite Bullet Laser Bore Sighter ammo for 300 win mag
The bullet laser bore sighting system 300 win is a precision machined brass tool designed to save you time and provide accuracy when sighting in your optic. As well as caliber specific factory alignment. The caliber specific casing is factory aligned and houses a high output laser that is powered by three alkaline batteries. Batteries are included.
- All brass housing bullet laser
- Factory aligned
- Provides accurate sight in
- Lithium batteries included
- Saves time and ammunition
- ammo for 300 win mag
- Item model number: XSI-BL300WIN
- Manufacturer: GSM LLC
- Brand: SME
- Color: Brass
- Sport Type: Hunting
- Item Weight: 0.01 Pounds
- Material: Other
- Type: ammo for 300 win mag
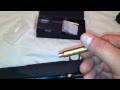

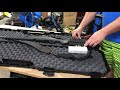
All right, we’ve read the instructions it just supposed to stack inside the laser, a little light really thick like old-style hearing aid batteries, and then you just take a little cap and screw it back on, and apparently you just take this little key, there’s a little laser. Apparently you take the key and turn it back off. So I’m assuming you just didn’t cert this just like a just like a regular case and then why, on your scope up with the laser, so let’s see if we can’t get this set up and see how it goes all right.
Here’s what I did I just took and took a piece of wood and climbed it to the top of old barstool set my sight box on the top of it, and you can see the tape measure down there and I measured out 18 feet and I just took my same target that I used for my other bore, sighter and used it, and if you look, they get a nice crisp, clear dot where before it would Halo out and I’d, never could actually tell where it was I.
This should give me a chance to set it up. Save some ammo I put my crosshairs on my scope on that top set of crosshairs leave that when writing dead center, and it should pick me where I need to get we’ll go from there. Like I said this should save me, some mo4 I couldn’t get a good laser dot. They would Halo out and be all over the target and he was trying jingling around.
But this one just fits right in the bore. Leave the bar open, the bolt open, lock it back slide that in there I just used a punch slide it in there straight see if I can’t set my scoop, all right that didn’t take, but a couple minutes just got in behind the Scout and dialed her in and we’ll see how she goes from there. I’m gonna take her to the range and shoot it, but I can’t complain gives me a pretty easy way to dial.
In my scopes, without shooting a bunch of ammo at least I can look and see. If I can zero the scope out, sometimes you’ll get them too high or too low. I think it’ll be a good little addition to the sighting in Sector we’ll go from there.
I, don’t know about y’all guys, but I’m everything and I have a bore, sighter kit, where it’s really good. It has the adjustable um little inserts that you can put inside there and it worked really good all, except for that part right there and you got a muzzle device on there. The arbor is actually made to go all the way inside the barrel to hold it straight, but when you’ve got a muzzle device like a flash, hider and one went to arbor, go all the way, and it only sits out here at the end where it needs to be down here, good, two inches, so we’re gonna try a little something different cuz I hate, taking my muzzle device off if I put a new crush washer on and all that other stuff and I’m always constantly changing one scope off one rifling onto another, so multi-site right, I’m not going to give a review on it because I don’t know how it works.
But basically it’s supposed to be a two to three size case. I’ve heard a lot of people say negative things about this one because you don’t have a on and off switch. It comes with a little key or just comments like a flathead screwdriver, and basically you just stack your batteries inside here and it’s a two to three case that you can shine the case. The laser straight down the bore and then set your scope to it. So we’re gonna see how it works and we’ll go from there.
First thing: I got to do is read the instructions cuz I’ve, never fooled with. This looks like it comes with a little handy little case, and some batteries check it out. This one is for the two two three: they make them for all kind of different calibers I’ve got some friends that use the I, think it’s a sight mark or something like that that we’re looking online and unless this places this things are like $29, then you gotta have them shipped I, actually pick this one up site right, I got it at my local Academy for $29, so the same price in a spaceship, so we’re gonna, put this little jewel together and see how it works.
Quick video on these little laser bore sighters. This one here is a 2 to 3. Basically, I am having an issue with the bore. Sighter I noticed that when I went to go line up the gun and I took it out and put it back in again and notice that the laser has moved the crosshairs wasn’t where I line it up previously. So basically, the problem is I’ve been reading online. Some people, you slide, this bore sighter. If I can get it in there with one hand, then things are so friggin hard.
Ok, so I got it in there, as you can see that the laser is going down through the barrel, but the problem I’m, having is I, turn my light on here. So if you look down the chamber, you’ll see that the bore sighter does not go in the chamber all the way so which the problem is every time you put that in there it’s not seated in and it’s not allowing to give an accurate reading. So when you close the bolt up, you can’t you can’t lock the bolt down and it’s not allowing anything the seat to be positioned in there properly.
So, if you can see it, you see how far the bullet is sticking out and it’s probably like a quarter of an inch. It’s hard to see her tell, but that’s the problem I’m having and that’s the problem. A lot of people has been having with these bore sighters. Now. Why are these not fitting in there properly I do not know. Obviously it’s not manufactured correctly. I have no idea, but you can see. There’s some markings on the bore, sighter right there now I, don’t know if there’s something wrong with the thickness of the shell and there’s some markings right here and also right here.
So I don’t know what the issue is with the bore sighter, if it’s uh not allowing it to see them because of the shell is not properly manufactured, but I just want to know. If anybody out there is having the same issue with this bore sighter and it seems to be just a 2 to 3 my readings and finding on the website, that’s seems to be just a 2 to 3. So leave some comments. Let me know what you guys been having 4 problems. If you had the same problem and I, don’t forget to subscribe lots of good new videos coming up winter’s coming later.
There are four different adapters to fit all calibers between 22 and 50. Please see the instructions thread. The correct screw into the back of the napkin then screw the adapter onto the tapered section of the laser board tool tightening. So it just fits snug inside the barrel. Insert the laser bore tool in the end of the barrel, turn the laser on or off by simply rolling the switch shine. The laser out to the 25 yards adjust the crosshairs, so they are directly on top of the diet.
Use the daylight laser target, make it easier to see in certain lighting conditions, I’m Brandon Butler, with wheeler engineering and I want to introduce you to our professional lazer boards. We’ve already used our professional scope, mounting kit and professional reticle leveling system to ensure this scope was installed properly and is now aligned ready to divorce. The professional laser bore sighter comes in this plastic storage case and includes a lithium battery that operates the daylight green laser or the red.
Laser first step is to install the lithium batteries go ahead and remove the coating on the on the rear, magnet professional laser bore. Sighters is a machined aluminum body with a soft rubber overmold.
Hey everybody how’s it going it’s a daily shooter and one of the downsides is making any changes to the sighting system on your firearm. Is that, regardless on whether or not you’re going from a magnified optic to a red dot to new iron, sights or maybe you’re changing over the sights of your pistol each time, you make a change to that sighting system. You had then have to rezero in that firearm right, and that takes time you have to go to the range it takes money you have to pay for the range you have to pay for the ammunition, and so what I like to do is try to cut out as much of the middleman as possible and try and save myself as much time and as much ammunition as I can so in the past.
What I’ve been using is one of these. This is a laser bore sighter. This one is by Bushnell cost about forty dollars and it uses a set of arbors in order to go into the end of the barrel of your firearm, whatever you’re going to sight in and those armors can accommodate anything from. Let’s say a 12-gauge shotgun all the way down to a 22 long rifle well. The problem that I had with this sight right here is that for my nine-millimeter, I actually broke the arbor.
So now, I have the sighting system right here or this little red laser, and this laser bore. Sighter is no longer good unless I buy a whole new set of harbors and I can do that, but it’s kind of a pain because they get old and they get fragile and they break so I decided to try something new. That’s what we’re going to do here today and I’m going to show you guys this product we’ll do a little review on it, and this is the sight mark. 9 millimeter laser bore sighter the difference between this one right here and this one right here is instead of going in the end of your barrel and shoving it in the end of your barrel.
This actually fills the chamber of your firearm and shoots a laser down. The actual bore so you’ll be looking through your optic through your irons, whatever you might be using and you’ll be able to then acquire that red laser, that’s shooting down your bore and make your adjustment to kind of save some time. The one thing to remember: whenever you’re using a laser, bore, sighter and something that I’ve been doing for years, is that you’re not looking for perfect accuracy? Okay, you’re, not gonna, buy a laser bore, sighter and then all sudden start, you know driving tacks right through the bullseye every single time.
A laser bore. Sighter is good for getting on paper. Now with this, this Bushnell right here I’ve, actually really good luck getting on a 12 inch target at 100 yards every time that I’ve used it it’s. It’s worked out really well for me, so I’ve been happy with that laser war cider, but I wanted to kind of avoid the arbors and that’s why we went this way now. The reason that I picked one of these up right now when I did was I just put this stove right here. It’s a scope that I had lying around.
It’s a utg 3 by 9 by 32. It’s the bug, Buster scope. It’s got a dual illuminated: reticle mil dot reticle and you know it’s actually turned out to be a great scope. I mean people could say what they will about this scope, but you know what for under 100 bucks, it’s really done well, so I have a blinking scope. It’s not a go to war scope on my plinking carving. This is not the go to war carbine either, but since I made that change now, I have to redo everything and get everything in so this 9 millimeter right here should help me do that? Okay! So let’s take a closer look at what comes in the package here we have our 9 millimeter laser bore sighter.
It has your, don’t be a dumbass warning on it. This is an actual laser, don’t point it in your eyes, don’t point in anybody else’s eyes. For the most part, it comes with a little carrying case and then the carrying case has your instructions and whatnot, and you can see that that folds open right here. This has your instructions, we’ll open up that preacher. That’s where the batteries are going to be held okay, so you have your instructions and another little card here.
That tells you a little bit more about the sightmark products. So here’s our case right here. Nothing really fancy, but it looks like it will work by holding that and then you have two batteries now. One thing to remember is that there is no on-and-off switch for this. Laser bore sighter right here when the batteries are installed, the laser is constantly on in order to turn it off. You have to take the batteries out, so let’s go ahead and put the batteries in and make sure this thing actually works.
It’s very easy to install the batteries. You can see right here that the back of the laser bore sighter just comes off the batteries drop down in the back, so we’ll go ahead and we’ll do that real quick make sure this thing turns on, and thankfully it looks like everything works, just fine. You can see that we have a pretty nice-looking dot right there from our laser bore sighter, so we’ll go ahead and take that out now we’re going to do some measurements and compare it to an actual nine-millimeter bullet, make sure that the specs are at least at least somewhat decent, but we’ll take a look at the calipers and see what they read.
Okay, so here is our real 9 millimeter cartridge right here and you can see that it measures point three. Eight eight I am measuring this at the rear, because, if you don’t know a nine millimeter cartridge is actually tapered, so I want to get it at its widest point and near the back. We’re looking at Point 388, pretty much right where it should be. Okay and here’s our bore sighter, you can see right there that it measures exactly the same point. Three eight eight point: five really want to get down to it, but basically looking at tenths, hundredths and thousandths, and it comes down to the exact one thousandths of an inch, so very tight tolerances.
So you know it’s going to fit in your chamber. Okay, so quick demonstration using the pistol, you can see that we have our red dot on the black flag down there, and that is sitting just above the white dot on the front sight post now, depending on what type of sighting system you have, you want to just get that aligned so that if your sighting system, maybe is a Glock, and it has that you shaped white symbol. However, your sights lineup you’re supposed to lighten them up, so that that red dot is perfectly in the center of your sighting system.
If you have your sighting system where it’s supposed to be and the red dot is off to the left off to the right up or down, that’s how you know that you need to make those adjustments now. One thing I did notice is that even at let’s say, seven yards around that type of range, 10 yards, the dot doesn’t get much bigger than you see it right now. So if the dot is actually low, it will disappear and you’ll have to kind of bring your sighting system in to match it until you can actually see the dot again, because you should see a little bit of a flare over your front sight.
So, let’s see if I can get the camera to focus in here, and you can see that your for this pistol right here, we have a three doubt system, bring the three dots down together and that red dot does have a little bit of a flare, and it looks like I’m pretty straight on when I look through it. Let me see if I can make some adjustments now. You can see right here that I have my three dots lined up as best I can obviously using the tripod to do that. You can see that right now, I can’t see the red dot from the laser whatsoever.
So basically you kind of have to move your eyes around, get a get a good view of it see if you can see it through these little side post right here. If you have a little bit of space between these notches and your dots see if you can pick up on that laser and make a make the call basically whether or not you think that that’s where it should be or not now, let’s take a look at our laser bore sighter through a magnified optic. This is just for demonstration, so I’m only sitting at about 15 yards right now and I do apologize for any camera shaking or bad camera angles.
I’m actually holding this on the buttstock as I speak to you, so I’ll try and keep it as steady as possible, but you can see there it’s a nice little red crisp dot. I am looking a little bit low and to the right. So that should be very easy in order to adjust my point of aim. Remember: your point of aim is different than your point of impact so having that red dot on the center, your crosshairs, when you do, that doesn’t mean that’s where your bullet is necessarily going to hit.
So do keep that in mind. Point of aim point of impact completely different things, but I wanted you guys to be able to see that through the magnified, a reticle right now, it is sitting I. Think yeah we’re looking at only three power right there, but you can see at three power. That’s what it looks like very easy to adjust. It’s going to be extremely easy for me to bring that reticle down to match up to that red dot. They’ll be able to make whatever adjustments I need to at the range, but it sure does take out that middleman.
Well, hopefully, that was a good enough representation of what this laser bore. Sighter is what it does, what it looks like from behind a pistol and what it looks like through a magnified optic. Now, full disclosure actually dropped. This thing, like three times when I was taking it out of the chamber on the high point I knocked it out, came out of the pistol grip when shooting off I picked it up and then dropped it again. So, when I reached down to grab it I accidentally kicked it across the room and it still works.
So I inadvertently did a torture test on the sightmark. Laser bore, sighter and the thing still works, and it still works perfect. So just an FYI. If you do drop it, there’s a good likelihood that it’s still going to work for you. It seems to be pretty pretty well made and pretty solid, so I’m really happy with it. So far. What I’m going to do now is get everything sighted in I just showed you guys demonstration purposes now, I’m going to get it sighted in at seven yards.
Get this sighted in at 25 yards I’m, going to take it out, do some shooting and then we’ll do a range report see how close this actually got us 2-0 versus the Bushnell I’m thinking that it’s going to be pretty good, though, because you know what this is pretty on and this was pretty on. So thank you guys very much for watching link is in the description box. If you’re interested in this please like subscribe, have a great day. You.
All right, I’m gonna, do a little video on aim. Item aim: Sports Inc, just come in the mail, all the instructions on the back danger, which is a very strong laser, so there’s some Maureen’s on there do not point this in people’s eyes. Okay, so, basically, with this laser bore, sighter I’m, going to show you how it works and in the previous video I just want to add that of the two to three. We have issues with that.
Not fitting in in chamber. Well, I have never read anything about the 3006 or any other caliber. Besides a two to three having an issue with the laser bore, sighter fading all the way into the bore. Now I’m gonna just unbox this and give you a little demonstration of that and we’ll see if this one fits in there perfectly it’s a tenth of a side. This is the 3006 and it fits in a 270 in 2205. So so here’s the 3006 casein laser, bore sighting.
Like I said it’s also fit into 270. You see the laser is fairly strong. I did try this actually to let you know. I’ve already put this in a chamber and I actually went to about a hundred yards and gave it a try, and it did work perfectly so. I lined my gun up as close as possible about an inch high at a hundred yards and I actually fired it, and it wasn’t off very far like maybe one klick upward down the Winnie’s was fine, so I’m gonna show you exactly like how good this one fits into the chamber.
Slides are in there no problem and you can actually close the bolt down the problem put the Gunners safety, because you don’t want to hit that trigger and fire and hit that I guess they can hurt them. So, as you can see, the laser is being projected down to barrel no problem, so I’m gonna show you now inside the action how good this third got six both fit down on the barrel. Okay. So as you do know that when you open up the bolts to pull it out, that is going to come flying out, so be extra.
Careful, so I’m gonna slide this back. In that the it fits in there perfectly push this down no problems. You know that fits in there. The way it’s supposed to so every time I went in lined put that in there and check the crosshairs with the laser. It was right on like every time, I put it in, took it out, put it in a check it each time it was perfect. Other hand at two through three I’ve, been having a little issue with I, was speaking with a gentleman that I purchased it from and he’s gonna.
Send me a new one and we’re going to see how that works, which I’ll do a little video on that and let you know how the new one will work if it works or not, but this is a 2 2 3 or the spray. This is a 30-I 6. Laser bore sight by aim sport pink, so.
Mizugiwa Rifle Belt Ammo Carrier Pouch ammo for 300 win mag


- 12 rifle cartridge loops
- Tri Fold Pouch Designed to be easy to carry and Use
- Made to aid in game hunting
- Rifle Cartridge Padded Holder Carrier
- Quality tested and ensured for maximum durability
- ammo for 300 win mag
- Package Dimensions: 6.5 x 5 x 0.7 inches; 1.6 Ounces
- Manufacturer: Mizugiwa (BJ) Co.,Ltd
- Type: ammo for 300 win mag
MAYMOC Bore Sight Laser Red Dot in-Chamber Cartridge ammo for 300 win mag


SPECIFICATION
— Output Power: <5 mW
— Laser Class: IIIA
— Laser Wavelength: 632 to 650 nm
— Battery Type: 2 sets of batteries
— Range for Sighting: 15 to 100 yds
— Dot Size: 2 in @100yd
— Operation: on/off end cap
— Operating Temp: F/C 14 to 122 / -10 to 50 F/C
CAUTION
— Be sure that your firearm is unloaded and pointed in a safe direction before attempting to insert the boresighter.
— Do not dry-fire your firearm while the boresighter is inserted. It may cause damage to the bore sight.
BATTERY INSTALLATION
1.Be certain that the batteries are all facing in the proper direction to ensure proper function of your boresighter.
2.As the bore sight doesn’t have the on/off switch, please remove the batteries after using.
HOW TO ZERO YOUR FIREARM?
1.Set your firearm in a gun vise or other stable platform so that it does not move.
2.Insert your boresighter fully into the empty chamber. And sight in your firearm at any desired distance that the laser is visible (25 yards is recommended).
3.Align your firearm so that the laser is centered on the bull’s eyes.
4.Remember to remove the batteries of your bore sight to preserve the battery life, and store in a cool, dry place.
- 300WIN MAG, Enhances precision and accuracy.(Batteries are included)
- There is a 12-Month Warranty for good customer experience. Please contact us via email at anytime if you encounter any problem about the Product. We will try our best to solve your problem. Also, if you don’t like the product or if something happens to it please return it for a full refund or a new one! No questions asked!
- Operation: On/Off End Cap ; Laser Type:Visible Red Laser, Laser display Sighting Range 10 to 75yds.
- adjustments to sight in your scopes & sights without firing any ammo.
- Lightweight and compact Power: under 5mW, Non handheld Class 3R lasers.
- ammo for 300 win mag
- Product Dimensions: 2.6 x 0.49 x 0.49 inches; 0.42 Ounces
- Batteries: 3 LR44 batteries required. (included)
- Manufacturer: MAYMOC
- Brand: MAYMOC
- Item Dimensions LxWxH: 2.6 x 0.49 x 0.49 inches
- Compatible Devices: Handgun
- Type: ammo for 300 win mag
BRONZEDOG Leather Cartridge Case Shell Holder ammo for 300 win mag


- Leather cartridge belt holder size: length 6″, width 1″, height 3 1/2″. Ammo bag accommodates belts up to 1 3/4 inch wide.
- This hunting pouch is made of genuine split leather and designed to carry 8 of .30-30 .308 .30-06 or 7.62 cal cartridges.
- Cartridge holder is easy to carry and keeps rounds at hand.
- This rifle shell holder comes in black, khaki or brown colors.
- PLEASE NOTE that cartridges shown in the pictures are not included.
- ammo for 300 win mag
- Manufacturer: BRONZEDOG
- Color: Brown
- Brand: BRONZEDOG
- Material: Leather
- Type: ammo for 300 win mag