

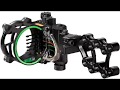
- Trophy Ridge Fix Series 5 pins
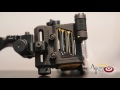
- TRUGLO Range-Rover PRO LED
- Trophy Ridge Mist Sight with Green Hood Accent
- TRUGLO Storm Ultra-Lightweight Compact
- HHA Optimizer Lite 3019 | .019 p
- TOPOINT ARCHERY CNC Aluminum 5 Pins Or 7 Pins .019
TOP #1 
Trophy Ridge Fix Series 5 pins sights for compound bow
|
TOP #2 
TRUGLO Range-Rover PRO LED sights for compound bow
|
TOP #3 
Trophy Ridge Mist Sight with Green Hood Accent sights for compound bow
|
TOP #4 
TRUGLO Storm Ultra-Lightweight Compact sights for compound bow
|
TOP #5 
HHA Optimizer Lite 3019 | .019 p sights for compound bow
|
TOP #6 
TOPOINT ARCHERY CNC Aluminum 5 Pins Or 7 Pins .019 sights for compound bow
|
Trophy Ridge Fix Series 5 pins sights for compound bow


- Dependable precision with micro-adjustable pins
- Ultimate visibility with ultra-bright .019 horizontal fiber optic pins
- Heightened accuracy over longer distances with second-axis adjustment
- Adjust brightness to suit any Shooting Condition with the rheostat light
- Pin adjustment tool stores on sight
- sights for compound bow
- Manufacturer: Trophy Ridge
- Brand: Trophy Ridge
- Color: Black
- Style: 5 pins
- Item Dimensions LxWxH: 10.9 x 4.8 x 4.3 inches
- Sport Type: Archery
- Material: Other
- Type: sights for compound bow
Hey everyone how’s it going today, I’m gonna, do a quick little beau-site review video for you. I! Don’t do a whole lot of review videos, but I was in the market for a bow site. This fall and I settled on the Trophy Ridge six-five, but there wasn’t a ton of videos out there. Really maybe I found one and it was just I had to do a lot of digging to find out some really basic information about this site, and hopefully this video will help you, if you’re in the market, for it to make a decision, whether you want to add it to your arsenal or not, and just a quick side note on that whenever I started looking, this fall for a bow site, I had I knew I had the bow hunter gear issue.
So I was like well looking there and see what is on the market and what they’re pushing this year and out of the nine sites that they list in here only one was under $200 and that site was about 140 and I, just kind of feel like it’s frustrating, because I feel like they’re pricing, the average everyday hunter who just wants something solid without a ton of bells and whistles out of the market, and so that just I saw that I just started digging myself online, and this is what I ended up with, but I’ll get a different angle here and give you a close-up of the box and we’ll get into it here.
Alright, so I bought this site on Midway USA I got it on clearance for $69 I. Think that’s about 20 or 25 under what they normally charge for him. There was a little bit of damage here on the corner of the box when I received it but doesn’t look like he got close to the actual bow site. So we should be fine there. The packaging is strong. As you can see, it got some corrugated cardboard there and the front just says what what we got. We got a 5 pen, right-handed horizontal pins and they are point 0, 1, 9, diameter, pins and I mean a lot of sites are coming with that diameter now.
But my old set was a true glow and I’m. The pens were at least twice as big and I’ve had that one for about 14 years, and it was just getting pretty rough. So that’s why I decided to go with a new sight this year. The back of the box here just says what your adjustments are. It’s got it it’s made out of aluminum, which is one of the things that I couldn’t see online. Hardly any of the sites listed what it was made out of, and it’s kind of a big deal when you’re looking around.
You want to know what what your site is gonna be made of when it gets to your door. It’s got a rheostat light on it. They just talk about how bright the Pens are and the one thing I when we get into this, but this site has an onboard, an adjustment tool, so they kind of like incorporated the tool for adjusting it into the site itself, which is handy if you’re out in the woods- and you have to make some quick adjustments, but one disappointing thing: I saw and I didn’t even really look into this, just because I thought its trophy Ridge I just assumed it would be made in America, but that was my fault and it’s made in China right here, design, tested and proven in the USA, but I just it’s always depressing.
Whenever you find everything being made in China all right, we got it out of the box. This is my first look at this, so there’s no predetermined position. This is just my honest. First take review, looks like we have four mounting positions here, so that’s convenient depending on how far you, like your site from your riser I, would say that these are the quiver bracket holes on the end. One thing is curious to me is that this part here is seems like we have two pieces here this piece and this piece, which should be fine if it’s tight and lined up right, but you kind of like one-piece construction when you can so we’ll see how I feel about that with use down the road.
Looking at the fiber optics, everything is encased in plastic, which is nice, there’s no loose ends that can break off. You can see in here they got where they run up to the site right here, they’re all encased, so that’s my it’s not gonna get a stick in there or some grass or whatever, in and yank out your fiber optics. The front of the site here is got a rubberized coating on it, and I would imagine that that would help with vibration. Since most of your vibration is gonna travel to the front of the bow and your site is one of the things that sticks out farthest out the front of your bow.
So here’s this see if this will focus. This is your tool right here and you can unscrew that this part I did see online. This was one of the things that they actually did talk about, and it’s just a little little allen key. But that’s nice I’m, a don’t know how often you’re gonna have to adjust in the field. Hopefully never but I. Guess it’s good to have it there another feature about this site that they did talk about a little bit online. Was these pins or micro-adjustable, which the top of the site has an Allen, an Allen bolt for every single pin and what you do is that there’s a thumb screw- and this is one of the things they didn’t talk about.
There’s a thumb screw right here that you will loosen, and you can micro adjust all these pins from these allen, bolts and I. Guess once you have them adjusted you just tighten down that I. Guess it’s a flat screw and you’re good to go. This is kind of I guess if this site has bells and whistles those are the two things about it, that I would say, but it is nice, hopefully once I start adjusting it to be able to just move those pins. However, little that I want to or, however much that I want to, because it seems like with those other sites, whenever you have, you have to move the individual pins, it’s hard to get them precise, like you can get them close, but it seems like no matter how hard you try to hold it, where you need it.
When you tighten that allen bolt up it’s it’s off just a little bit so that’ll, be nice and it’ll be interesting to see how that works. I might post another video once I get it on my bow, but it’s got a nice site ring on it. Nice and bright looks like it’s pretty durable might even be inlaid looking at it, but that’s one of the problems with my other site. The site ring was a sticker in it. Just came off completely so you got your light right here and, depending on what state you hunted, you have to check the game law, I, don’t normally use the white and the Pens seem seem really bright.
I mean it’s I, just this was sitting in the dark a minute ago and it’s they’re really lit up so got your level overall, it seems like it’s well-built, no there’s no loose parts I’ll, probably hit every little screw and just make sure that they’re they’re tight, because I have had new sights rattle loose before. But here’s your wait for it to focus those are your micro adjustments for each pin here, one through five and that’s like. Basically, your pens have windage adjustments on them.
So that’s pretty convenient and I’m excited to see how that works, and then you just have your basic your basic windage adjustments like every other site, except for there there’s you know once you loosen the allen key, you can adjust them with your thumb. So, but I’ve been looking at trophy Ridge, sights for a few years now contemplating getting a sight, but it always threw me off that I. Don’t know why they do two green red and two green, like I, really wish they would do like a green, yellow, red, yellow green or something to that effect.
Just because, whenever I was younger, I was always concerned that I would get my 20 and 30 or whatever they end up being confused, and then that would cost me a buck, but I feel comfortable enough. That I bought this site and I’m excited to see how it works. I hope that this video helps you if you’re trying to make a decision. I, don’t normally do review videos. So it’s a little rough comment and tell me what I could change I’m, always looking for suggestions and, like I said we are almost to a thousand subscribers, so please subscribe and hit the like button check out our partner, Nevins hunting friends.
We do a lot of the filming and editing for them, so it’s all about youth hunting in the outdoors, so check that out and I. Just thanks thanks for watching this video and we’ll try to get a bunch more out to you. This fall good luck. This season, you.
Hey doing this for sho McVeigh Sean’s outdoor adventures that I’m doing a quick review on the Trophy Ridge react Pro site here and I’ve been using the site for a little over a year. So I’ve had quite a bit of experience with it and I want to give you some feedback on it. I want to say that all in all I have really enjoyed the site as far as signing it in it is the easiest site. I’ve ever had for site again you site in two pins and you’re, basically done so.
If you site in your 20 pin and in your 30, pin your 40 50 60, at least in this one, is a 5 pin they’re pretty much on and to fine tune it. You know you can go back to 60 and if it needs a little bit of a tweak, you can do that. But then that affects all the other pins. It’s all tool free, which makes it really easy. I, like the positioning of the slight light as well. It’s in an area that doesn’t get bumped a lot real easily so and it’s also pretty snug to get it started.
I really appreciate that I just did a review on the IQ, Pro xt site and the positioning of the site light down here. It just can get bumped on things real easy and that can turn on your site light without you, knowing it, you go to get your ground blind. You go to turn it on for a shot and your lights. Not there that’s going to really mess up your hunt, and you know if it’s a the biggest buck your life you’re, going to be pretty upset so I, don’t like how that’s kind of out in the open and the.
Let me hang this bow for a second, the turning all of this. The knob just turns on too easily so I’m, just pointing that out in as a comparison I do appreciate about the trophy Ridge react pro light: it’s a little bit snugger. So it’s harder to turn on just a tiny bit which helps prevent it from getting bumped on as easily and everything else about this site. I have really enjoyed. There is one thing one thing I wish so badly: they would find a fix for, and that is the 20-yard pin or your first pin it’s set.
That’s where it is, you cannot move it. I would like to see the ability to set that pin where you want and still have all the other pins come into alignment. We need it. The distance from this 20-yard pin to your level is so far in your vision that it makes a little bit hard to. You know utilize that level I personally have found that my accuracy is best when my pin is just about in the middle of the site housing. It’s just easier to line everything up and in all of my other sites, I set my twenty pin right around the middle and then I can usually fit my 60 I pin just down above the level there and it’s easier to see all of your pins and your level I’ll use my level a lot to make sure I’m vertical to get as much accuracy as I can.
So that is my only complaint about this site. I wish so bad. They would change that and I hope that maybe they see this video and they look into. How can we do it? So aside from that, though, it really is an enjoyable site really easy to site in it. You don’t have all the headaches of individual pin movement like that’s the one one. One kind of thing I haven’t really liked about the IQ, although I really like it that retinal lock is really neat, it’s individual allen keys to adjust each individual pin and that takes a long time and it can be a hassle, and if you move just a little too far, you know now you’re back at square one.
So I really like that about the trophy Ridge. So that’s my take that’s I get I do give the site a thumbs up, I have enjoyed it and I would recommend. To my friends. That’s my honest opinion thanks so much for tuning in until next time take care and God bless. You.
My name is James mogul I’m, the trophy rig product manager for Baer archery and we’ve just recently launched three new fixed sights. They are the six three, the six five and the six seven, and on these three different sites, we have a micropenis estimates for the pins. We also have an onboard tool that comes with the product, so that you can do your micro adjustments just this tool right here and basically, you set your site using the pin here and we have them mainly in the right hand, version for those right-handed shooters.
We also have second access adjustment there on the site and we also have the rheostat light for that light. To light up your pins for you on all three of those models, we start out at the fixed three at eighty nine. Ninety nine, the fixed five is at ninety nine. Ninety nine and the six seven is at 109 ninety nine. So this is our react. Five site and a lot of our customers may know of our original react site. This is the updated version of the react site. We just gave it a new name to h5.
Basically, we have a smaller shroud here on that and we have that polycarbonate composite material that we use to make that site and again it has all those features that makes react site one of those sites that, after the first two pin adjustments you’re dead on accurate at the rest of those pins, two simple adjustments and you’re good to go. It’s amazing to see people when they take this site, they get it on their bow. They do those first two pins and as they adjust that second pin and they see the other three pins move down into their position.
The light bulb goes on and they say: I get react technology and they get excited about it. They kill their friends and on this model it does have the second access leveling as the previous version- and it also has toolless. Windage adjustment and you’re also comes with the light, like all of our other models, to light up those pins for when you’re in dusk or dawn settings, and you need that extra light in there. The new react. H5 is available at your trophy ridge. Dealers for one $49 99.
What’s up guys Walker hoechlin, it’s rockin on hunting adventures and it ever get a little different video for them, because I live you guys about keeping my site I’m above in the last video, because I have to work today. I went into our local Big Bear and do a little shopping around and just couldn’t help myself add upgrade so before I get into that.
I would like to discuss why I’m getting a new site. Take my quiver off real quick, so I assure you. I am a shooting like a $30, 5-pin, true blow site and I. Don’t know what model it’s called whatever. But if you can see what pins are all really low, so I mean my 60 pin shoots a little low and I mean I, can’t drop it anymore and I dropped the whole site as well as it can go so I’m trying to pickle there, because I mean I’ve been shooting for like five six years now and I know that I’ve got the actual forum and stuff to shoot out to like 60 70 yards, but I can’t because my sidewall I mean I know my bows got it even though I’m shooting a heavy arrow, it’s still accurate out there, so I mean I decide to upgrade so there we have that old, true blows going off after you guys are dying to see you guys.
Yes, try to help me. The video is God new release. – I, like these hard, like strange releases, are solid. All the way through I just feel a lot more solid in my shot but uh for the site. We have trophy ridges six seven and this costs me one hundred and ten bucks didn’t have the shop round sight. So I don’t know if it’s cheaper anywhere else, but I couldn’t help myself afterward today.
So it’s about its time in my work, clothes still so yeah we’re going to rip into her fresh out of the box already throwing screws around I. Just can’t wait to get my hands on them. So I’ve always heard good things about trophy Ridge, I’ve, just never on the trophy ridge site. Before so I mean there. She is fresh out of the box.
It’s huge compared to this other side, huge! It’s going to be sticking out of my bowl like another three inches and it’s the fixed seven. So it actually has seven pins, which means in all reality I could shoot out to 20 30 40, 50, 60, 70, 80 yards I could slide it in out to 80 yards like even with a bigger site like this I.
Don’t know if I’ll be able to get to stretch out the fog we’ll see whoa. This is a lot more high-tech than the truth. Look not to do some reading, but uh that came with the two Allen screws and it’s now just a matter of ripping off the old site and throwing on the noon. So I got take my quick, my quick quiver release off and then I should be able to take it off mother site, I, don’t even know what I’m going to do with this true glue aside, I mean might save it is a myself fishing boat or something like.
Oh, we were just throwing stuff guys. So that’s my little attachment for my quick liver so by the quiver through my own wrench. It’s always good, so yeah I will pop off the true glow. Now the sad day have this safer, pretty much exactly you know: I bought it last year, just to upgrade from my three pin to a five pin and I should have spent the extra money and got a better 5 pin.
But you know you just got to learn the hard way, sometimes and I’m just going to sing something, even though I do all these reviews and stuff like I am 100% honest in all my reviews, but you guys don’t don’t 100%. Take my word for your for what you’re buying, because I mean if I like something you might have a different preference like I like these solid releases like I’ll, say some people like the floppy ones, I mean that’s up to you, it’s what you’re comfortable with so test out products see what you’re going to like the best I just do an honest review of my opinion, who I think of the products I review anyway.
There’s the old, true glow, getting set aside. Now it’s time to throw on the hog daddy, the trophy rich fix 7. Hopefully we can knock a bowl down with this on this year, huh so I’m, going to the way back with it, so I get it out. As far as I can my toaster t-rex paper courage, probably’s, my quiver doesn’t look if I’m going to be able to so now we’re going to thread this on on the little height, 2015 hoyp charger, great bell for the my great go now I’ve, never ever used like a torque wrench or anything to put my sights on I check in so tight Rd.
You know I’m kind of thinking, I’m not supposed to use these holes back. These screws out, there’s another hole, think those are for my cleaver, but that’s alright. That’s alright still won’t be bad back. Those all the way out, I’m at as you can see, I never never used a trophy Ridge fix 7 site before so just as new at this- and you get oh well like I, said I’ve, never torqued any.
My bow attachments on I mean my my rest was torqued on it. I’m a bow shop but I just go til they’re, you know they’re, nice and snug tight, but I never I mean I was always Todd, never just reef, auto tight, because that’s that’s! When your sites get knocked off every time, you shoot it or you’re going to you know bust, open your threads and be screwed.
So I’ve always just done it. This way it works out just fine for me, so that drops a little bit so I put all that for hmm decisions. First, you know I want a higher okay, perfect, perfect. So a little overlay we’re going to do in this video just unboxed. It now we’re putting it on and then I’m going to go out to our little bunny block target today to just rude I, don’t like using 3d targets to set in bows, because you don’t have a perfect, perfect bullseye to aim for I mean I, like all my practice is done on a 3d target book, I like using a block classic those targets last forever and lent went out to a buddy a few years ago.
My when I did have and never got it back. So it’s when to buy myself another one, nice buddy yeah, so I just get nice and firm and I’m just reef on it and bust up threads and it’s getting nice and tight. So yeah, that’s the first look: I was a height with the new trophy Ridge 6-7 sight on it to be be site, definitely add a little bit of weight, but I’ll take a little bit of weight for some better accuracy, ops for sure I, like it I like it a lot so uh yeah, just a second try something new.
You guys go ahead and leave a leave. A comment on I mean if you guys have tried this site or if you’ve used other trophy rich sites. If you think they’re a good brand, I’ve never heard anything bad about them, but I’ve also remembered I heard anything bad about a true-blue, so I mean I’m, just kind of testing things out.
I grabbed a knife. Real quick, because uh honey I like to try things out of my own, but when I get into like – night for 110 bucks lost out of 40 I should have researched a little bit more of them. It’s got to be a good site. Can I give you a review on the site later. So this is the new release. Nice dole came cuz.
It ties I, mold Elyse was a true fire. Her true ball, it’s kind of the same company, but it had a pretty much the same thing going, but this is a fifty dollar. It’s called the hurricane and the last night was just like the like $30 00 woman, I kind of misplaced. It I always tie it on my bottle, but for some reason, I didn’t I.
Think I was going to shoot the new heights, so I brought just my release and I left in my buddy’s truck, maybe well I. You know I, like upgrades every few years, I’ve always liked the spring loaded, true fires, what I yeah so the next clips you should be seeing me fling in a few arrows with the new site I’m just going to dial it in a little bit.
Knocking to video the whole setting in 80 yards process is I’ll, be a thirty to forty minute long, video but I’m just going to dialer in it like 20. Probably then give you guys an honest review on how easy I think it is the site. This thing in looks I mean it’s pretty intense, looking really but I’m sure, there’s some stuff for me to read in the box and stuff to figure it out, but I yeah.
So I was unboxing and assembly of my new site and see you guys out on the range. Okay guys just want to show real quick before we go shoot this stuff I can look at any instructions or anything that actually didn’t even include any, which seems a little weird, but I figured something out already, so you set the whole I mean you raise and lower the where you raise and lower and left and right the whole site for your first top pin.
And then you have six adjustments right here for your next six pins and you just unscrew this little thing here. They call it their tool that goes in the allen key and when you spin the allen key, it actually moves this little dot here to each little tick. And it’s like that’s the best adjustment I’ve ever seen on a site in my life, I mean I’m, sure other people have done it unless strophe image patented it because other sites, like my true glue, usually have to undo your allen screw and then just slide it.
It’s really hard to get it perfect. So I mean that that right, there is that’s awesome. I mean I’m, not sure how well it works. How well it holds up when you’re actually hunting out in the woods. But if it does, that’s awesome. If you quick, look down on it, real quick, glows up bright kind of see that light the back with the pins light up.
Nice I, like that light up, lit up ring I mean it should be. It should be perfect, so yeah I will be sure to video me cite me in okay, guys throughout the range and first shot is going to be only at ten yards, because when you get a new site, you don’t want to send an arrow five foot overtop of a target and lose it so I already kind of tried to line up the left and right.
So wouldn’t you left or right too bad I mean it’s going to be: it’s not going to be dead-on, but should at least hit the target. I hope so so the first shot goes again put my hat back is real, quick, let’s see what we can do is 10 B trophy Ridge looks to me like I, just shot way low, so I’ll go check it out and see you next shot all right, so I shot way low, so move my site down quite a bit.
We’re going to see if I move it enough or I need to move it. Some more I want it to shoot a couple inches high ten because that usually a dead-on 20 with my bow. So let’s try. Another arrow looks like it’s still buried in the ground. We have to move it a lot I’ll be back after I move my site, okay, so the last hour was still way low.
So I moved it like five times as much when I move it the first time. So, let’s see if that gets us on target, if not I might be in trouble, because we’re getting pretty close to Maximus I doubt still way low a little left so I’m just going to max the side out and see where it’s at okay, this max to side out I’m, not totally screwed, because there is on our mind, I, do have on the lowest case so I’m not hitting that Center dot height, hopefully an inch over it then I’m going to be kind of screwed here.
So you can’t move the actual pin on this site. You can move the bottom six, but you can’t move the top one. You got to move the whole site to set in the top one we’ll see how this goes and we’re still shooting about two inches low, so I’m going to move my site over. Let’s try to get the left and right perfect.
Then we’re going to drop back to 20 and see what it does at 20. What’s that setting so see you guys at 20, okay, I’m, going to shoot all three, my arrows aiming for the center just moved my site, try to Center it a little better. You know this goes, didn’t move it enough. We’re still going to shoot all three the heights, not too bad.
It’s maybe in inch and a half two inches low, but we are at 10 yards, not 20, so we’ll see I mean I, don’t know, I’m, not sure what else to do, except for there’s no I shoot a little well at 20, though the other one’s perfect. So that’s nice group for 10-yards. You should build a group, get ten yards l, so you should probably start practicing more but uh so I’m going to move it just a little bit more if I double what I just moved it and then we’re just going to step right back to 20, so see you guys at 20 all right guys, we step back to 20 yards I.
Actually did you three more on video and my grouping is perfect on left and right, perfect, nama groupings, perfect nice tighten up my shot right through Sam Dan way too much all right, I shot right through when my fletchings at PI 1 inch group, so I mean that’s what we’re after for grouping but I. Don’t like that being low.
So we’re going to see how low it is out of 20, because I call I’ve, always called my top hand. My 20-pin, how excited into 20, because you just hold a little low at 10, probably got pulled a little high to 1 my first 3 shots are about, so you have a name that on sale low, it actually shoots out here, I’m, not sure that fletching is going to fly I’m going to reflect it.
Obviously, but not right now still got two you get one. It should fly good enough, but definitely not a hunting arrow. So we’ll see how this goes. I can’t see that here I can the camera whale oh really drum. What is it all pretty close together now I’m, just name hi, I guess this is this next arrow is going to be the bad flushing close -.
She flies, so those all looks pretty close together. So if fat guys I am going to conclude the video and I’m either going to go by the adapter they make for Hoyts, because holy makes their site screw in holes. We hire from the rest and other boat companies do so this no matter what company is actually made, an adapter to drop your site a little bit.
Huh Michael pick one of those up, but for now I’m just going to zero all the other pins, and just remember that I got to aim about six inches high 20 yards. So with that I’m going to conclude this video I’m hope you guys subscribe to watch. You know how I built up my bows I build up. My rifles and I mean we’re going to have.
Hopefully some good hunting footage coming off. This fall blow haunting and rifle hunting, hopefully more blow hunting one of these abilities and does it go as well as we wanted to we’ll pick up the rifles and yeah. If you guys are following this channel, then you saw our video 2017 is going to be different, so you can believe us or not, but we’re going to we’re going to go a lot harder than usual.
So hope you guys like this video hope, I taught you a few things about how I’ve always set it in bows and how I work on my bone stuff, but hope you guys enjoyed and hope to see you guys next time.
Hunting bull project, trophy reg, was nice enough to send over five of its react, h5 sights. The react. H5 is in the second tier of trophy ridge, sights falling just below the react. Pro models, this site retails for about one hundred and sixty dollars, which is $100 less than the equivalent pro model, so that $100 savings you’re going to give up third access adjustability, along with all aluminum construction. This site is made of trophy ridges, ballistics copolymer material.
The site also comes with a rheostat light, which comes with fully charged batteries, and now that I’ve set the site up on six different test, bows I figured I’d, show you how I did it before I really get started? I’d like to put this site on the Brightside 3rd access leveler, this site doesn’t have third access adjustability, but when I put it on the bright side, I can make sure the second axis is perfect when it comes to mounting this site on your bow, you’ve got three different mounting options.
You could technically use this fourth one, but that’s supposed to be where you put your quiver and if you do use this, when you need slightly longer screws, so you make sure you’ve got enough threads going into the riser, so you’ve got good purchase with the site once the react. H5 is on your bow, put it targeted at twenty yards and sit in that top pin using the gangue vertical and horizontal adjustments, which are totally toolless once you’re, confident you’re sited in fully at twenty yards, move your target up to 30 and start setting in with the second pin to make adjustments.
Here you need to put the allen key in the top and just make small counterclockwise or clockwise adjustment, and that will move all four bottom pins once you’re sited in at 30 yards. The theory is, you should be just about done, however. I like to double-check things, with the 60-yard pin just to make sure everything is where it’s supposed to be, because all five pins are relying on you being perfect at twenty and thirty yards. I find this can lead to some mistakes.
For me, when I’m shooting at 17 or 21 or 22 yards I find the difference really negligible, no matter what I’m at I’m going to still hit the X. If I’m doing my job, it’s when you get out to 40 or 50 yards that that one or two yard difference really starts to be noticeable once I’m, confident I’ve got things settled in at twenty and thirty yards I’m going to move my target up to sixty yards and really try to settle in that bottom pin. If I’m, hitting a little bit high or a little bit low at sixty I can make a small adjustment here.
Any 30, 40, 50 and 60 are pins, will move just a hair. I can get everything dialed in and if I’m good at 60, I’m good at 30, the 40 and 50 yard pins are always good too. Once that’s done, you and your react. H5 site in your boat are ready to go.
TRUGLO Range-Rover PRO LED sights for compound bow


- Zero-In Adjustment Dial With More Than 80 Pre-Marked Yardage Tapes (Included) For Simple Setup; Micro-Adjustable Windage With Precision Click Design
- Black Reference Circle With Lighted Center Dot For Superior Long Distance Accuracy; Adjustable Led With 11 Brightness Settings (Cr2032 Battery Included)
- Tool-Less Yardage And Windage Lock; Laser Marks For Windage And Elevation Adjustments; Adjustable End-Of-Travel Stop Customizes Maximum Yardage Settings
- Adjustable For Left- And Right-Handed Shooters; Updated Bracket Design For Increased Compatibility With More Bow Models; Adjustable Quiver Mount Included
- sights for compound bow
- Brand: TRUGLO
- Color: Black
- Style: 2-Dot
- Item Dimensions LxWxH: 10 x 9 x 3 inches
- Item Weight: 1.05 Pounds
- Material: Blend
- Type: sights for compound bow
Hi I’m Vicki, San, Cerullo and I’m, where choice and the choice TV shows we want to share with you the newest version of The Archers, Choice, Range, Rover, Pro, the ultimate hunting, archery side ooh, my favorite, the new version of the archers Troy’s Range Rover, pro new push-button design for easier brightness adjustment remembers the last you setting when you turn it back on bottle power off after four hours, without adjustment, the dot automatically powers off.
It saves your battery life over 80, multicolored, yardage tapes to calibrate to any speed zero, an adjustment dial, it’s toolless micro, adjustable adjustable level, glow ring lens cover and the available magnifying lens. You know we have trusted and relied on the innovation and the new technology that true bow has constantly brought to the archery industry right every year. They come out with new products and we’re excited to share them with you again. But the biggest thing you have to remember is when brightness counts.
Yep tone are true blow.
Okay, today, I want to do a review that I YouTube on some of the the single dot pin sites, and this is for the true glow. Archers choice range rover Pro. It has the one pen adjustable LED green light. It’s their power dot sight. It’s one of theirs is a fully adjustable. So if I can get it over here, it has the dial on it so that you can dial in your yardage. Just like your single dots glow-in-the-dark ring, as you can see, I’ll just put it up.
For contrast, you can see see out in the dark. There’s your pen and I really like the sight. I just got it in a couple of days ago, I had an issue mounting this on my height shooting a Hoyt kotero 2009. What Catera absolutely love this bow, but I had a small issue with it when I got ready to mount it, they get it back over here on the table and I’m going to set this up and I’m going to take the bow off I’m going to take the sight off of it.
Real quick, okay, I’m, going to take the sight off because I haven’t I, haven’t put this thing on with with the Loctite yet so I want to show you kind of what I ran into with this and the only this is the only thing that would make me give this a four star. Instead of a five star, I’ve shot it, it took a little bit of dialing in and a little bit of ingenuity to figure out exactly what I had to do on this I’ve, taken it on and off twice now to make sure everything fit and I’ve put it back on, and it has I’m hitting hitting dead-on even after taking it off.
But here was my issue: I ran into me, get it all the way off! There’s two sets of mounting holes for this in this bracket. We’ll get these off okay around here, where I can see this all right, you’ve got a set of holes here and then, if you go up with an adjustment, dial you’ve got another set of holes. So when I was mounting this on, my bow and I started out trying to use the top two and I’m going to show you why I started using the top two when I line this up right here to use the top two holes, it was causing this to actually hit right there on the boat trying to get where you can see that and in the setting.
If I tried to use the two top ones, I could not drop the elevation down enough to get it to hit. I was shooting five foot in front of the target. I mean I, couldn’t even get close to it. There’s a good good good photo of it here and I was really starting to get aggravated, trying to figure it out and then I said well, there’s got to be some way to get this up and use use a some shims, so just to try to get some I took it.
I took three washers ended up. These were 3/16 of an inch thick I’ll put those on there did a mock mount up of it. It cleared this titin I got the screws in there got them tight. We were barely barely barely touching that screwed it down cited. This thing in was able to use the the top up here. These right there use the top two which actually brings it down on the bow and gave me my clearance cited it in absolutely wonderful, even though after I dropped it down.
As you can see, I am still on my elevation, all the way down to the bottom and actually had to lose a screw, but the things on there good and tight. So if this was the, this was the only thing that I that I really had a little bit of aggravation about was that I’m dropping this all the way down and and why to make this work, but now that I’ve done that it works perfectly fine, so I’m going to show you what I did buddy of mine, he kind of had the same problem with a with an 8h, a one pin site and he shoots a Hoyt.
He had the same issues so he turned around and he went and spent I don’t know. 10 15 bucks bought some kind of plate. They actually send you. This is an optional mounting bracket for a for your quiver, which I’m going to put on there funny enough. This actually fits. This bracket actually fits on the bow on those exact holes. It’s a little bit thicker than 3/16 on it when you use it. So what I ended up doing was I ended up finding some rubber engine mounts that went to a little small engine.
I can’t tell what it was, but anyway, I took these off there they’re quite dense rubber holes were fine, they kind of matched up on the bow they matched my holes, nice. So what I did was I take them, took them and put them on the bench grinder, because they’re too hard to cut put them on the bench grinder I ground them down to exactly where I needed it to the kind of the shape that I needed so that they’d fit on the bow.
Actually, this one goes down here, so I mounted that one there, the other one’s already already on there and I will I’m gonna, put some Loctite on these and we’ll tighten these down. Show you what it looks like and then I’m going to shoot it a little bit and just kind of show you this. This thing is this is awesome, I, absolutely love this site. You can’t go wrong if you’re, looking for a one pin or you’re looking for one of these dot sites, but this this thing is phenomenal.
I’ve, already split, two arrows I’m, just playing around with the thing I mean man. If you don’t pick a completely different spot, that’s an inch away you you will Robinhood some errors with this thing. It is it is that accurate, so I’ll be back in just a minute. We’ll have this thing mounted up and then I’ll show you what it looks like. Okay, folks, well, I got the cut. My bow put duct on get my screws in there with Loctite.
Now, because I’m very happy with where how this thing’s sitting put my stems under there, I went ahead and mounted the optional quiver bracket. So now I fle can put my quiver on I’ll. Show you the adjustments down here, as you can see, I’m all the way down to the bottom. It has a really easy right-to-left feature for your windage, the top screw there just unscrews with your finger, there’s your adjustable knob so that you can dial the the middle light to different brightness as they glow in the dark housing site.
Housing, green sorbets that you can see. I’ve got the dot on there and you can make it brighter or dimmer as a level you can see inside there’s your markings for your windage there’s my two rubber shims that I put in to get it off the bow and when we were done as you can see, it’s it’s right at the edge of it. Here’s the dial that is on it to dial your your yardage. This is one thing I liked about this one versus some of the other ones and how they operated.
I can actually operate this one when I forgot the release. Okay, it came with a whole bunch of site tapes for different different yardages I mean it comes with a pile of them. What I did was I took a blank. One put it on put it on here found my 20, then I went to 30 and then to 40, and then once I got my 40 I took the cards tapes. Then you just you, take them and you figure out which one which one matches up and mine just actually happened to be card number one.
So card number one worked for me: tape, one I pulled it off stuck it on this thing. Has it’s it’s not very difficult, but it’s not real too easy, so that you’re just going to bump it back. Then you can suck and roll it and it doesn’t roll. It does have a knob to tighten it down and then it doesn’t roll it all or you can loosen it just enough so that when you’re sitting understand you need to adjust it real quick.
It has a limiter screw that you can set so that you can’t go over and actually drop your sight down into your arrow. Excuse me: okay, so mine I actually set mine because it went a little bit further down I’m actually up to about 62 yards I haven’t even shot it to sticks, the up shot it to 50, but where I hunt most of the time, 60 is going to be plenty fine for me now. If I want to go out west, which I did at Illinois every year, but I’m not going to shoot it probably anything over 60 anyway.
But this is a really really really nice sight, I, really like it. So what I’m gonna do is I’m actually, even though it is completely pitch black outside just to show you I can shoot in my garage. I’ve got a target out there. A block target set up at 19 yards I want to die my sight sight, pin in right at 19, just under my 20 and I’m gonna sling a few errors up there and just show you how this thing how it works.
Okay, this is going to be at 19 yards okay, so, as you can see, three shots, three black dots and we’re hitting on all of them and I’m very, very, very, very happy with the sight. So here you go. If you have any questions feel feel free to. Let me know and thank you for watching the video.
Selling the true glue, Range, Rover, Pro duo, that’s right, Range, Rover pro duo and we’re about to install it, but first we’ve got to take off the Rocky. Mountain single pin dovetail bow site which I’m having problems taking off because it’s dialed up now and now I got to go through this whole thing about dialing this thing up, but hey it. Lease is set up, ready to go and we’ll see what happens so stay tuned. Here we go well that’s why boobs Ariel I wasn’t working right in the place Park on the place, suckers rock’n’roll road put the boom and quiver mount back on, and we tell you that this is ten times better.
You see that there it is here we go looking forward to it, see what happens. What is going on ground roots outdoors? This is Aaron Moore’s dead and yes, the true glow Ranger over Pro duo, the setting up of and that’s what it looks like. So it looks like ok, the windage on this thing was pretty good anyway, and just to show you real, quick, this little knob right here. You just turn that, and this right here is your micro adjust and you just turn it a little bit either way all I had to do is turn it right just a little bit and it was perfect.
So then, ladies and gentlemen, right here are two screws: I’m, sorry they’re their weight going wrong, wait there. It is right there, those two screws right there you hadn’t loosen both of those and that’s your elevation to get it cited in okay and, of course, the sight tape. This is the the practice or the sample site tape which I’m going to use to kind of get dialed up and I’ll mark it with a sharpie and I’ll, come in and get the right one set up, but anyway, I went to 10 yards to see where it was that it was hitting low but and I made my adjustments.
I wanted to be about two inches high at 10 yards, because then that’ll kind of give me an idea of where we’re at as far as distance, so stay tuned, we’re gonna start shooting. Here we go here. We go everyone get my release. I’m gonna intentionally! Aim a little low first just to see where it hits, so it doesn’t go flying off into the woods. It’s true shoot another one just to see where, at this time, I’m gonna aim at the bullseye. Oh, that was a thud not or a thump, not a thud, on a target like this.
If we hit a thump, that’s a good thing. That means that’s where you hit normally a thud. That means you didn’t hit where you’re supposed to do that. Second, one, let’s find out where we’re at almost sue me in hope there. It is all right, try it! This is typical! There we go I’m gonna, take a walk here. It is first shots after making small adjustments and I think I just nailed this sucker we’ll see we’ll shoot a couple more check it out. Alright, this was a first shot which is still pretty decent.
This is the second shot at 20 yards and that thing is bull’s eye Oh hold it alright. Ladies gentlemen, anyway, like usual, there are flukes in archery, so we’re gonna fling a couple more girls down there and see where they’re, hitting and we’ll see. If this thing’s dialed up- which, if it is it’s the easiest, both side I’ve ever dialed up before I literally made two adjustments, so hopefully that’d be awesome. Here we go, we are gonna, throw a curveball, I’m gonna, throw a lighter arrow at it and see what happens.
Yeah I was shooting the Beeman’s, because if I lose one of them, I don’t care. Whoa, whoa rhaggy shoot another one see what happened. I’m gonna pause, you and I’m gonna get my phone out and we’ll go from there. So stay tuned. Alright. Now to the mobility of the phone and, let’s see where we’re hitting now, as I said, I use the bone collectors which are about Oh, 30, 40, grains, lighter and yeah I can move it move it up. Jews to here check it out. Coming up. Look at that. That was the first one.
Now here’s the second one. This is the easiest, both side I’ve ever used. That’s ridiculous! I was quick setup and it said ease of setup now, unfortunately, or fortunately here at my father-in-law’s, that property is up and down, there’s a lot of hills and so I don’t really have anywhere. I can just reach out and fling an arrow, so I’m gonna have to go, see Choctaw or tree to set this sucker up. But let’s see what happens, I think that was me there. It is there. It is starting to get sore because I have him shot in a while and ouch all right.
So there’s my third shot and there’s the to the Bone Collector I’m, tired and I was gonna. Do some 30-yard shooting but I, don’t know we’ll see, I’m hurting pretty good, tired, don’t know if I got the stability for it. I got to start working out again because it’s like I said you got to condition yourself to shoot and I’m I’m tired got to get after it been doing too much tile, laying and stuff in my house. I haven’t had time to season myself. So trophy are the true globe: Range Rover produ! Oh, it’s actually really easy to set up.
I did kind of see if I could stretch it a little bit and shoot some 30-yard shots and I did a little bit. I didn’t record them. Cuz I want to do it officially, then I go out to the choctaw artery. So anyway, it is really easy to set up next time. You see me we’ll be setting up site tape for it and we’ll be rocking and rolling. I will say: I love that led, though, that thing is nice. It makes it real easy so taking a walk down here to pull some cards so anyway, if you like what you see each thumbs up, if you like what you see, they’re, not a subscriber hit the subscribe button and smash the little bell for notifications.
That way, you get all my crazy videos. So hopefully you enjoyed what you saw and welcome again to ground roots outdoors and stay tuned to the next time. You.
What’s going on ground roots outdoors, that’s right! It’s aaron morristed and thank you for joining me today. Ladies and gentlemen, you guys know that I have done some recent videos on the range rover pro duo from truglo. Okay, this bow sight is a led. If you guys remember, it’s got two led lights in there. You got your true point and that’s your your dead set and then, of course you have your uh, your configuration point, which is the second led, okay, and it said that you should be able to if you’re dialed up to 20 yards, that bottom pin or that bottom light should get you 50 um, I will say it does work.
I know I’ve said that before, but I’m gonna say it again. It does work okay, but this video is about the lights on it. When you turn one of the lights on and you you take it back, say you turn it on full brightness and you turn it down all the way, and it comes all the way to the point where it you can’t click it anymore. It won’t. It won’t go off unless you click it again and it’ll go back to being ultra bright again.
Okay, I’ve had some people question, ask some questions of. Is it shut off or are the lights still on? Okay and so uh? You know so I’ve always heard, and I’ve read and all that stuff that- and I guess I misunderstood, but it said that the lights were off. It was just residual glow uh. No, it’s not okay, and I did what I was supposed to do.
I went and I got a hold of trophy or true glow, I’m so sorry um, I gotta hold the true glow and truglo said that if you click both the arrows okay, if you click both the little buttons at the top, the brightness one and the lower one okay, you click them both at the exact same time and they just click it down. It will shut the lights off.
So here’s a video of me showing you how to do it stay tuned. Okay, so, as you can see, ladies and gentlemen, the lights on there are at low dim and then I click it to bright, and then I click it to low and uh so yeah they’re on. So you guys can see how I went and I clicked it to bright, and then I clicked it to low and vice versa. And then, if you watch real carefully, I double clicked it and when I double click it it shut it completely off.
Okay, and so hopefully this will help you. And hopefully you see what I’m talking about that you can click either button one, the forward button or the back button, and if you hit the back button when the when it when the site is off, it will be the brightest at its that it’s going to be. If it’s off and you hit the front button, it’ll be the lowest it’ll, be the brighter the light you want during the brightness of the day.
All right, ladies and gentlemen, like I said, the brighter the light is outside the brighter. You want the light to be on your led, bow side, okay and then the lower the light, the lower the light you want it to be. Okay- and the reason for this is yet, ladies and gentlemen, is the reason for this is, is that you want if you have a bright light and you got that bright light on and it’s low light outside? And you look through that peep, I promise you you’re gonna blind yourself.
Okay, you will blind yourself, so please please, please, please make sure that you have the right setting on your bow side, okay and so number two. It’s also the other way. Around too is the lower the light. You really can’t see it. Okay. Now the neat thing about the range rover pro duo is it’s a. It almost looks like a scope, reticle, okay and I have actually used that without the lights on and matter of fact, my dough- I just shot, I shot without the light on okay um, because I didn’t need it.
It was bright enough outside that they came in and I I had enough sunlight coming through through my ground blind and it lit that scope up like you know, I call it a scope, but it’s not it’s your sight, housing. It lit that thing up nice and bright, so I was able to see the crosshairs and I was able to put that thing right on there and I knew it was a 20 yard shot anyway, and so I got it done so.
Ladies and gentlemen, again, hopefully this will help you guys make sense of of the range rover pro duo. Uh I was shocked. I I was always thought you know I always thought and plus from some some videos and stuff that you just you keep clicking until it till it looked like it shut off and of course, I always thought well. Is that residual light from the leds just glowing and now they’re not glowing anymore or is the light still on guess what it was still on so boys and girls.
Hopefully this helps you out. Hopefully you guys are are having a great season this season so far. I am I’m I’m doing. Okay, okay, I’ve had an opportunity to shoot a couple and I just made bad bad calls on my part. It wasn’t because of the equipment or anything. It was just a bad call on my part and I’ve missed three. Unfortunately, and one really nice buck, I’m an idiot but hey that’s what happens to us? Okay, when you get out and hunt, sometimes it happens to more of us than it does to others.
So anyway, hopefully you guys like what you see if you like what you see hit your thumbs up. If you like what you’re seeing you’re, not a subscriber hit the subscribe button and the little bell for notifications. That way, you get all my videos, hopefully again like I said. Hopefully this helps thank you guys for subscribing. We are up to 83 subscribers on this channel and and we’ll keep on growing, and that’s all that matters guys because uh I might have to do a do.
A a giveaway or something here pretty soon so never know we might hit that 100 100 subscribers. We might do a giveaway, I don’t know, never know so. Stay tuned have a great day: oh yeah, tomorrow is election day, get out there and go vote you’re an american. Do your american duty and go vote. I don’t care who you vote, for I don’t care what platform you stand on.
Ladies and gentlemen, just go. Do your american duty and vote? Okay? That’s all there is to it. Go america.
Video for a dairy cow- and he mentioned about one this site, but I figured since I had some time tonight. I’d do a little kind of just a short little review on it. You’ll have to excuse me, my allergies are horrible right now the Barkers choice, Range Rover pro by true glow. This is actually the third one I’ve got from them, as I mentioned in my post couple days ago. The other two they always come right handed and inside here is a little screw that it’s three thirty-seconds own head and they walk tight.
All the screws in and well yeah it’s a pain to get out. You must say I stripped the other two and called him up complained, and then they had finally shipped me, a left-handed one completely converted to left-handed. So I was happy with that other than it didn’t come with anything other than what you see here. There is no cover for the aperture, no quiver mounting bracket, no mounting screws, nothing just sight, but they did upgrade me to the push button operation, which is kind of nice, but I, know I mean I heard.
Eric was a question about the site itself and just kind of take a little glimpse of the light here. I mean it’s on now you keep dialing up the brightness on it and it goes up to 11 different settings and it’s nice if you just push both buttons at the same time and it shuts off push button again and it’s right back to where you were so. I will turn the lights out here and you can see for yourself the settings oh yeah in the little the ring glows like crazy, so, okay, there’s the first plate which is I believe on the website.
It’s like point 0:05 and it goes all the way up to 0 02 9. I don’t know when what increments it does like somebody else said: there’s 11 different settings on this thing, so it goes up pretty bright, I mean there’s 11, there’s one. So it’s fairly bright, a nice well-made site, it’s pretty much all aluminum the gears are plastic or some variation of plastic. Here, get the firm to focus there. The other plastic and the washers I mean they’re silent. It’s a quiet sight to adjust. I mean I, haven’t mostly haven’t messed with it at all.
Cuz there’s a sample tape on it, but it is a quiet sight to adjust I. Just like I said, I haven’t mounted on my bow yet cuz, it didn’t come with anything to mount. To my bow, yeah I mean I, don’t really have much else to say about it other than what I know now. You know if you’re planning on buying one of these and there you want to get one left-handed. Your best thing is to call true glow and just tell them suddenly one because, like I said they lock tight all these screws in here and even this little 3/32 one inside that sight, aperture, which is mighty mighty nice of them, so that you strip it and have to send it back, which, as I said, I sent two of them back so far and on a third try, I told them to send me left-handed ones, though, to the folks of true glow for that other than that and I.
Don’t really have anything else to say: I mean it’s a fairly reasonably priced site and I paid like 100. In 120, bucks I believe it was online for it so, and it is what is some guys like spot Hogg, some guys like CBE and Montana Black Gold is generating. Is this always telling me to buy instead of buying true glow so yeah? It is what it is nothing much more to say. Yes, happy hunting and shoot straight fellas.
What is going on, ladies and gentlemen, and welcome to another edition of round routes outdoors with Aaron Moore said that’s right, ladies and gentlemen, where you go to find good deals and to see where you can save money and where it’s time to pay money for a good products for fishing and hunting and other outdoor situations. Now, ladies and gentlemen, if you know me, I’ve also got my other youtube channel dum la conner outdoors for my kids in my class, but I did some reviews on the Rocky Mountain single pin dovetail bow site.
It’s amazing. I actually was going to stick with that bow site for this year for hunting. However, it’s a great bow or a great, both sight and I’ve done my reviews on it and everything, but my wife this weekend, while I was tiling the floors at her house, which I am NOT a Tyler. She went out and she bought me a new bow site which she’s awesome. Ladies and gentlemen, let’s unbox this bad boy, because this is what it is, the true globe, archers choice, Ranger over Pro duo and the duo, ladies and gentlemen, is a continuation of the range rover pro which they had gotten rid of the single pin.
It’s a single pin bow site. However, they got rid of the single pin and they went with a single, led green light that you can adjust the the brightness and the the dimness and all that stuff guys. This actually was a really good bow tie problem is there’s a lot of reviews on it. That’s that people say it’s not for not good for bow hunting and because one they say it rattles over a lot guess what usually vibrations in your bow when you’re shooting it’s under that much torque things are starting to come and start going to go loose, so you might want to tighten those screws up common sense, however, or do like I do and intentionally pull every bolt out, one at a time put Loctite on it, put it back in okay but anyway.
So that’s one thing also to you forget to turn the brightness on when you forget to do this or you can’t a deer moves in and it moves and you just guys any single pin that you get is going to have its limitations, because everybody knows that deer turkey, elk guys their eyesight is amazing. Their smells amazing, so any little move any unnecessary, gadgetry and stuff like that will cause attention. However, when you’re like me and you’re older and your eyes start to get tired and you start having problems with halos or clouding or your pins, you know because I normally use a trophy ridge face.
Five five pin bow sight and they are it’s I’m getting to a point where, at certain times of the day, at low light situations, they start to cloud each other, okay and so I. Don’t like that and that’s why I made the move to a single pin. It’s the only reason why and now this one they come with sight tapes. You know that way. You can pick the right side, tapes of your bow and they’re there there’s over a hundred of those dudes in there, and there are multiple speeds, multiple stuff, it’s setup for your for multiple bows and that’s amazing.
I, like that idea so and most of the tapes will actually allow you to reach out to a hundred yards now. Does anybody really need to shoot a hundred yards heck? Yeah? Everybody gets to shoot a hundred yards with a bow. If you can just at targets not at animals and that’s a whole nother ballgame, we’ll talk about that later, I will go into a rant on that. One and I want somebody, but but anyway, just saying sweet. Okay, then they give you a cover. Okay, true glow cover to cover your the site, housing.
Okay, then there’s the installation, instructions and how to work it don’t be it don’t be a typical guy, actually read the instructions for once I learned that the hard way on some things and yeah. So when your wife tells you read, read just sayin okay, now at first I’m gonna tell you one thing: I don’t like about it already, it’s heavy because it’s made out of out of metal. So as I mean that’s a good thing is durable and you know people sit there whine and cry and say that it’s too loose I don’t hear any rattling, except for rattling in my hands.
Idiots anyways, like I, said you know, cool thing. Is they got a bracket right here? You can take this off. This is for your quiver, pretty slick and it’s modified now and so yeah, and actually you can actually use it to mount. If you need a little spacers for certain bows, this thing will do it for you, okay. Now this is the sample tape. You can actually use this to kind of get your markers or they give you clear tapes that you can put that on there and you can mark your distances and all this stuff and yeah I’m gonna leave that on there and I’m going to use that as a referencing tool.
Okay, so anyway, then it’s got this little. Locking knob right here, you lock it into place when you’re traveling, and so so it doesn’t jack it up, but you’re gonna loosen it and leave it loose while you’re hunting, because you know you’re only one shot, it’s not gonna mess you up now. The cool thing is again: let’s zoom in here it goes all the way up. Sike tips going all the way up and then what happens is is here. Like I said you have your green LED, which is your Center and then down here you have a red LED, which is your distance indicator and the red one is actually a 50-yard mark.
Once you get the a yard mark set I check this out now, there’s a really light beam of it. You can barely see them, glowing, let’s hit it again and got brighter and again it gets brighter getting into gets brighter again, it’s even brighter than that. Look at that just keeps getting brighter and then it will shut off eventually, oh that thing is glowing like that boom gone anyway. So, ladies and gentlemen, this is the archers choice, Range Rover Pro duo, and it’s LED. It’s pretty stinkin slick, it’s got the magnifier lens in it and you can actually get another magnifier lens that can actually screw in there and make it more magnifying.
So, basically, I’m gonna have fun with this dude and we’ll find out really if this thing is as good as it looks and sounds, I mean the only really default that I can find on. It is it’s heavy and my rig, but my bow with my height and stuff. It’s already pretty pretty stout anyway, so I’m gonna have to work out. But if that’s, the only thing is that it’s a little heavier. Who cares matter of fact that actually will add some stability to the bow if I remember right, so it’s okay, I’m, alright with that, so really stay tuned part 1 moving on to part 2 and installation and deciding in of the Range Rover pro duo, hopefully like what you see hit the thumbs up.
If you like, what you see, if you’re not a subscriber hit the subscribe button, and if you also want to get notifications hit the little bell and that will let you know, whenever I put out any more videos- and hopefully hopefully, hopefully you enjoy. Thank you for watching stay tuned till next time. You.
Trophy Ridge Mist Sight with Green Hood Accent sights for compound bow


- Three ultra-bright horizontal .019” medium fiber optic pins for ultimate visibility
- Reversible mount design for use with left- and right-hand bows and high or low anchor points
- Properly align shots with the precision installed bubble level
- Green hood accent for quicker sight acquisition
- Multiple mounting holes for added customizability
- sights for compound bow
- Product Dimensions: 1 x 1 x 1 inches; 6.4 Ounces
- Item model number: AS106
- Manufacturer: Trophy Ridge
- Brand: Trophy Ridge
- Color: Black
- Item Dimensions LxWxH: 1 x 1 x 1 inches
- Sport Type: Hunting
- Item Weight: 0.4 Pounds
- Material: Aluminum
- Type: sights for compound bow
TRUGLO Storm Ultra-Lightweight Compact sights for compound bow


The TRUGLO Storm Compact Bow Sight provides incredible performance at an attractive price. Available in 3 or 5-pin models, the Storm features durable, bright fiber-wrapped pins, a large aperture and durable, CNC-machined aluminum construction, making it one of the best valueson the market.
- Durable, bright fiber wrapped pins
- Enlarged circular field of view
- Light weight compact design
- Lightweight and compact
- Enlarged circular field of view
- Durable, bright fiber wrapped pins
- Adjustable for left and right-handed shooters
- Easy read level in pin field
- sights for compound bow
- Manufacturer: Storm
- Brand: TRUGLO
- Color: Black
- Style: 3-Pin
- Item Dimensions LxWxH: 9 x 7 x 4 inches
- Material: Aluminum
- Type: sights for compound bow
One of the best deals out there, one of the most affordable sites and I mean totally durable. Is the new true go storm sites right there come in 5 and 3, pin options, they’re, cnc, aluminum machine now, again, they’re cnc, aluminum right a great value. That’s huge they’re, durable they’re, not gonna, break up on. You have a two inch diameter aperture. The five pin comes with the light right and either one is fully adjustable for right or left-handed shooters.
You still have the glow-in-the-dark shooter and also to help you, you know sight in there in the glow or light situations. The bottom line here is when you’re looking for a great sight at a super, affordable price, and you don’t have to worry about it break-in or anything, going wrong. True, go storm baby! You.
HHA Optimizer Lite 3019 | .019 p sights for compound bow

- Sight in at 20 & 60 yards and you’re dialed in from 20 to 80, in 5 yard increments
- Sight Housing: 1 5/8″
- Fully protected fiber optics
- Tool-free adjustments
- Fiber Length: 2 ft
- sights for compound bow
- Manufacturer: HHA
- Brand: HHA
- Color: Black
- Item Dimensions LxWxH: 8.5 x 6 x 2.5 inches
- Sport Type: Hunting
- Item Weight: 0.5 Pounds
- Type: sights for compound bow


Hey this is Alex from bow logic and optimizer light, so the optimizer light is a pretty basic single pin sliding site, but it’s got everything that you would need to be successful in a lot of different hunting situations, or you can just fling an arrows at the target. I put a lot of arrows through the bow, with the sight on it’s the first slider that I had and and I had a good time shooting it. It’s never. Let me down so get your sliding adjustment.
Here you got your locking knob, it’s a good, lock, knob, the way they do this hardware, unlike some other single pin sliders, you don’t have to move it too much. It’s just a flick and you’re you’re locked in or unlocked so that works out. Nice got the sight tape area that comes with like 40 or 50 different sight. Tapes. This is a number 41 I. Don’t have the sight tape kit for the light here, but I have the one for the ultra sit next to me.
The way that they do this is you have a calibration tape and this these aren’t actual distances that are on here. But what you do is you put the calibration tape on and you sight it at 20 and you’ve cited it. You know you’re 60 or you’re 40 and then whatever that corresponds to on your calibration tape, say your 20 is a zero and your 60 yard is 35. You would just subtract zero from 35 and that would tell you what tape number to use.
So in that case it would be 35. Like I said, this is a 41, pretty accurate, easy way to cite in it’s about all I got to say about that. They come with a clear film you can put over this to protect it from the rain. I’ve never used those and I’ve hunted with this a couple seasons and it’s gotten wet, and it’s been just fine, so nicest thing about this site for single pin. Sliders has got good, solid hardware and it’s quiet and smooth up and down right.
There were some issues in the past with hej sites and rust on the hardware, this site, I’ve, gotten wet a number of times and I still haven’t seen you any rust on this. So I’ve been pretty happy with that. Despite other people’s experiences, you got micro, just windage on the front, and you got your locking knob here. So, as you got your one click, it goes 1/8 of an inch at 20 yards. So it’s it’s easy to get it sighted in you know, whichever way this thing pretty tight and it’ll really lock it down like you’re, not going to move it.
So you loosen that up and then you can move, got an audible click. I! Don’t want to mess this too much because I might put it back on my boat and hunt with it in a week. You also got laser etched markings in the front, so it really helps you just to know where you’re at when you’re siting in you can also move your housing up and down. You can see you got a variety of options there for where to mount. It HHA says that you should go as high as you can, so you take advantage of the full range of motion.
Now these sites come in a 1 in 5, ace, housing or 2 inch housing. This is the one and 5/8 inch housing. They also come in the three main pin sizes, the 29 thousandth, the 19, thousands and ten thousands. This is the nineteen thousand, with the smaller of the two site rings bigger one and kind of compare here. That’s what the XL housing looks like next to the smaller housing. You can see it’s it’s quite a bit bigger. This is also the ten thousands pin compared to the nineteen thousand, so you can kind of see there just the difference.
This is the ultra another thing: it’s got a nice big bulb level on here. Super easy to see the one knock did. A lot of people have on HHA in general is that they don’t have second and third access adjustments on the site. You can. You can get the second and third access to an extension piece that that fits in here. It’s like 20 bucks to buy, and then that’ll give you your second and third axis, but it doesn’t come with it, but if you’re hunting, you know in the Midwest or in the East I mean chances, are you’re not even really messing around with second or third axis too much unless you’re doing 3d shoots at extreme angles or if you’re hunting out west, so I haven’t really messed with that, and I can be as accurate as I need to be.
With this sight, so I’ve been pretty happy with it. It also comes in there’s a version that has a real stat that slides over your fibers here to block some of the light, because these HHA these are some of the brightest pins out of all the the sights that I got sitting here. These are probably the brightest pins out of all of them. Even the the ten thousands pin on the other side is its a bright pin. So you can do with that, as this essentially just blocks the light out from your fibers.
So you don’t get pin Halen when it’s really bright out, you can kind of see how that that would would change it with the slide around there. It’s a little bit more money to get one of those, but it might be worth it. Other people just use electrical tape on there. It works, but it’s a little bit more of a hassle to use. So that’s pretty much it for this review. It’s a great site for a lot of people just getting into single, pin Bowl sites and I would really recommend it.
If you’re looking for a single pin in that you know, one hundred fifteen hundred and forty dollar range, all right, I’ve been really happy with this site for the years that I’ve shot it. So, thanks for watching.
How’s it going. This is Alex from the logic and we’re going to do a short optimizer. Ultra is kind of like the Big Brother to the optimizer lite site, the biggest difference. If people are going to notice is it’s got a dial instead of a slider and the dial makes for a little bit quicker, smoother and easier adjustments.
The nicest thing, though, about it, is that the site tape on the dial is marked for every yard. It’s got a mark verses every five for the optimizer light, so you can see that major distances here marked the minor distances are marked in between and then, if you look close on here, you can see there’s a tick for every single yardage out to the end of the site tape.
So you can. If you want to range at 38 yards, you can get on that really precisely and then you can lock it down. It’s got all the HHA sites have really good locking mechanism better than any other locking mechanism on a single pin, site and I can say that pretty confidently, because I have a bunch of sites sitting here in front of me, so HHA does have a little bit of a reputation for getting rust on the hardware.
This is a not an old site by any means, but it does have a little bit of rust on this bolt here and there was a tiny bit on this on here. I don’t have any rust on the optimizer light, but for this site, for some reason, just got a little bit of rust in there. So you got two different mounting holes to mount this to your riser.
You can get it. You know closer to the riser or further out from the riser, whichever you prefer, and then you have a hole for your quiver and it comes with a little adapter pieces that make it easier to mount the quiver. If you use the center mount quiver um, one of the other knocks and the hhas is that the light and the ultra the adjustment does get blocked a little bit by the arrows, depending on which quiver you use I use, depending on what kind of bow I’m shooting like with the white one-piece quiver.
It does kind of get in the way a little bit, which is unfortunate, but that’s just kind of the nature of a sight that has the adjustment in the back instead of in the front like spot hog or the black gold. So you got a couple different housing mount options here you can see. Hha always recommends you go as high as you can when you’re siting in at 20.
So that way you get as much clearance as possible. When you get to that that bottom end, all right, you got micro, adjust on your windage here, it’s audible clicks works pretty flawlessly, and then you got your lock down. I mean this locks down absolutely solid. It’s got markings here and markings here, so it’s pretty idiot-proof to get that that locked in this site here that I have this is the excel housing.
If you want to compare that to the smaller the regular housing I mean, you can see that the excel is quite a bit. Bigger I mean the smaller one is 105 ace and the bigger one is 2 inches between you. Just get them in here and you hold them in your hand like when I first got this site in the mail. I was surprised by how much bigger it felt and this one’s also 10 000 spin versus the 19 000 spin on this other site.
That I got in my hand. They also have a 29 000 I. Don’t have that I think with the HHA. That would probably be way too huge all right, so this 10 000, which pin on the brighter 10000 spins you have seen out there it’s plenty bright when you get it when you get it outside and get shooting with it, so you’d have no problem.
Shooting the 10 000th, unlike some other 10 000 spins, that you probably want to light for and then you got a look a little dampener in here. I, don’t know if it’s really keeps things that much quieter. It’s a pretty solid piece of equipment. I think it’s mostly just there for looks honestly. So that’s pretty much it with this site.
It does come in mechanical rheostat version to block some of the light from hitting the pins. Other people use electrical tape. That I don’t know if you can really see it with this site right now, but it will change the brightness quite a bit. So if you’re out in the middle of the day or just in high light in general, you can prevent that pin from hailing.
If you were gonna shoot like a twenty nine thousandths or the the nineteen thousand I would I would say that’s a solid recommendation, but for the ten thousands you might not need it all right I mean it’s plenty bright, but it’s not overly bright. You can see. Also you get a nice big bubble level on here. The last thing, I will say, is the knock that people always have on the HHA optimizers that they don’t come with the second and third axis adjustments.
You can buy a separate extension piece that will allow you to adjust. Second and third axis. It fits in right in here. It’s like 20 bucks, but yeah. That’s that’s pretty much it for this site. It’s a it’s a good step up from the optimizer light, it’s a little bit more precise if you’d like a dial, it’s worth it, but it does cost a little bit more money, so just things to keep in mind when you’re looking for a site.
So thanks for watching.
Hi I’m Scott Bakken, with HHA sports and today we’re sighting in our brand-new optimizer light. We just mounted the sight to our bowl and when mounting it to your bowl, there’s two options: there’s two different mounting holes: you have set of holes that extend the sight out a little bit farther from the bowl and then there’s a set of holes that keep the sight a little closer to your bowl. It’s all personal preference I prefer to have my skull, posing out a little farther so today, I’m outted my sight and the farther holes just to get the skull pausing out a little farther to sight.
In our sight, the first step we’re going to do is we’re going to shoot at 20 yards. There’s two methods you can use when siting in your optimizer light. You can use the 2040 method, which is shooting at 20 yards and 40 yards or 20 and 60, which is shooting at 20 yards and 60 yards. The preferred method is the 20 and 60 yard method. That way, you get the exact tape that you need. However, today you know not, everybody has the luxury of shooting 60 yards.
So today we’re going to show you, the twenty and forty method, to get your your yardage tape. So we’re going to start off at twenty yards here we have the target downrange on your optimizer light, you’re, actually going to want to start with your slide as far down. So when I say the slide, there’s a little brass needle. You want that all the way down and start from there and what that does is raises your skull.
Pausing up. So your skull pausing is up for closer yardages, it’s going to be down for further yards, so we want your arm down I’m, going to start for 20 here, I’m going to start at about mark 10 and just see where that gets me and then we’ll go from there. If you don’t have a lot of room or if you don’t have a big target like we have here to shoot at, you may want to start closer and do some really close range, shooting, like five yards, just to make sure you’re going to hit the target.
But for this purpose we’re going to shoot at 20 yards and see what happens all right, so our first shot left and right was actually pretty good up and down or probably about four inches high. So in this case, because I started off at mark 10 I have some I have some room to go down so I’m going to move my my adjustment arm and needle down as far as I can and we’ll see where that, where that puts us on our second shot, so I made the adjustment and now our needle is that is bottomed out at zero.
So this is, as far down in my slide as I can go so shot number two is actually a little bit low, so I adjusted my slide a little too much so I’m going to split the difference. My first arrow I was at mark 10. My second arrow I was at mark zero, so I’m going to go to five mark number, five on my setup tape and shoot arrow number, three all right. So arrow number three was perfect, so we found our 20-yard mark at mark number five.
So we’re going to make mental note of that and then we’re going to move back to forty yards and get our forty yard mark and again you can find your yardage Mark’s two different ways: the twenty and forty method or the 20 and 60 method, and right now we’re doing the twenty and forty method so we’re at 40 yards and if I was at mark five at 20 yards I’m going to go ahead and try probably mark 25 for 40 and just see where that gets me.
You know again, you know we have a. We have a pretty large target to shoot at so at home. If you have a smaller target, you know: go 20, 30 and then back to 40, but we’re just going to try mark number 25 and see where we hit there. So I’ll make the adjustment to mark number 25 and we’ll go ahead and shoot an arrow and see see what happens. Okay, so I was a little high at 40 at mark 25, which I kind of thought I would be, but it was worth a try, so I’m about a foot high, so I’m going to come down.
I’m I’m going to go from 25 to about 18, so I’m at mark 18. Right now and we’ll see what arrow number two does. It looks like arrow number two at mark 18 was pretty good, might be just a hair high, but for what we’re doing right now, that’ll that’ll work. Your groups don’t have to be absolutely perfect to where you have arrows touching each other. If you can put three or four arrows in a paper plate, that’s plenty of sufficient, so I’m pretty happy with that arrow.
So it looks like my 40-yard mark is at mark number 18. Now that we’ve found our two yardage marks that we need our first yardage mark being at 20 yards, our second yardage mark being at 40 yards. We can now find the pre-printed yardage tape that we need to have our optimizer light sight sight it in from 20 yards all the way out to 80 yards. So at 20 yards we’re at mark 5 and at 40 yards. We are mark 18 when you take five from 18 that gives you number 13, so we’re going to go to our conversion chart that comes with your optimizer light and we’re going to find number 13.
If you look straight across from number 13 it’ll it’ll reference number 29, this is going to be our final tape that we use so we’re gonna, find tape, number 29 in our list of pre-printed yardage tapes, we’re in a match up our forty yard mark on our yardage tape, with our forty yard mark on our setup tape. So our forty yard mark on our setup tape, was mark number eighteen, so I’m going to tape the forty yard mark on the yardage tape and I’m going to line it up with forty yard mark on our setup tape.
Now that we have our yardage tape laid down on our optimizer light slide, we have successfully sighted our site in from 20 yards to 80 yards in five yard increments. I’m Scott, with hhe sports check us out online at HHA, sport’s calm or you can visit us on social media on Facebook, Instagram and Twitter.
We’re gonna do a little head-to-head review of the HHA optimizer light and the trophy Ridge pursuit. I’m gonna try to keep this short and sweet. So these are ball single pin sliders. They got a super similar design on them. As you can probably tell there are a couple differences. The biggest thing is gonna, be the price between the two. The HHA is a hundred plus dollar sight. Depending on what model you you buy, there’s a three different pin sizes and two different housing sizes.
They come with the standard, housing and there’s an XL size, housing available. The pursuit is a 60-ish dollar sight, depending on where you buy it, plus or minus. If you get a good deal so shop around on that one, the biggest thing you probably notice is the build quality. Overall, with the HHA versus the pursuit, you’re gonna spend twice as much money. You’re gonna get a little bit higher quality sight. I mean it’s got just a little bit: thicker aluminum overall everywhere the hardware is a little bit higher quality, the bushings just the way it’s put together just a little bit higher quality between the two, and because of that, this thing operates super smoothly up and down it’s completely silent.
It doesn’t bind anywhere really nice up and down this one, not quite as high quality on on the adjustments with this, it’s got some some issue with the slider adjustment and these two screws here a little bit too tight on this site that I got out of the box and it actually pushes these bushings down into the housing and that causes a bind as they move to the top of the channel like that. So it’s not a total deal-breaker.
It’s just something to be aware of so next thing. Your your adjustments, your windage on this is standard. You’ve got to loosen that screw just slide. It left and right. It’s not laser etched or anything on there, so you’re flying blind a little bit, but it’s nothing that you know you can’t get adjusted either yourself or at a Pro Shop versus va-jay-jay. This has got micro adjust and it’s it’s all edged out here.
So it’s it’s easy to see. It’s got a lock on the front of it. It just it moves by clicks. That’s super nice. It’s never gonna move once you tighten that thing down. Pretty much promise you that another another thing to mention pursuit actually has second and third axis adjustments to come on it. It’s a leg up on this versus the HHA that doesn’t have those it’s one thing that people talk about. They don’t like about the HHA is that you have to buy a separate extension bracket for the hhj to get that second and third axis, but with this site you you have them both.
So if you loosen up these two screws here, this top one is slotted for your second axis, and your third axis is here on the inside. If you are to loosen up the pins on the housing, we’re not the pins. Excuse me screws here you loosen these two bottom screws and then there’s a third screw on top. You can tighten to adjust your third axis. You can see them moves like that. So, if you adjust this, you tighten this screw up its gonna get your third axis adjustment.
It’s not the most polished third access adjustment I’ve ever seen, but for a fifty dollar site I mean you can’t really complain too much about it. So next thing site tape kits this one doesn’t come with a sight tape kit. It just has this blonde glow-in-the-dark sight tape? Alright, you have to write in your marks manually I’ve, seen people use the HHA sight tape kit on that site. You can buy that separately.
Online comes included with the HHA. It’s a good system. It’s got like I, can’t remember if it’s 40 or 50 site tapes that it comes with and calibration two tapes, but with that you shoot it at twenty. You get your mark at 20 and you shoot it at either sixty or forty and then there’s some comparisons. You have to do on a table, but that’ll get you your site tape and it’s it’s really nice and accurate, so I’ve never had a problem, shooting that I’ve shot I’ve shot this site for a while now, so it’s pretty good, and the last thing is that the HHA doesn’t come with the light where the the persuit does alright, with either of these sites.
You got pretty bright, pins and you’re. Probably not really gonna need a light anyway, but the pursuit comes with mine. It’s not an outstanding light by any means, but it’ll it’ll do the job that’ll light it up. If you’re, you know you, you got no movement and you’re out hunting and it’s super dark for opening light. It’s a good thing to have. So, thanks for watching.
What is going on guys you can GZ outdoors here today. We will give you a product review of the HHA optimizer light sight. So, as you can see, I already got my sight tape on here. If you know anything about this item, HHA has this thing called a range dial shoot technology or already has technology pretty much. What you do is you throw a setup tape on your site and as soon as I find, I can show you. I can show you what it is.
Oh here they are. So the setup tape goes from zero to sixty five, and none of these, like the numbers, don’t have anything to do with the yardages at all. So if you think you’re gonna shoot anything you’re going to put your PIN on 60 and shoot 65 yards you’re going to have them stick and probably lose an arrow. So what you do is you put one of these setup tapes on their new sighting at 20 and 60 yards? And after that you do simple math.
You take the second number of minus s, the first number. So let’s say your second number was down to 45 and your first number was 10, so you do 45 minus 10, that’s 35, and you would select the 35-yard tape now. The one complaint that I do not like about these yardas tape as they go by every five yards and for me out, if you think you’re gonna be shooting past 40 yards I’d like them to go by the yard just because at 60 yards, if you, if you guess 60 by the thing, was but like your animal- is at 61 yards you’re, going to miss that animal completely or vice versa, but that’s 1661, you’re, probably going to spine it.
So I would like a ma. You know it to be on my by the yard, but anyway, everything on the site, except for the pin and the two plastic washers here- are metal and the plastic washers. Don’t really I really have a problem with that at all, mainly because um, you know that makes the site on silent. This does not have second thorax adjustment. The windage and the windage elevation are both old movers. So you got to loosen up this knob, you can move it, then you’re free to move it or whatever, and the windage is what you got loosing these two screws, and then you can turn this knob right here and it moves your own site, housing in and out.
This is not kind of second third axle adjustments, but if you’re playing on going out west and taking this site with, you need to go on the HHS website and purchase their second and third axes, adapter, which will which will probably plug like right around here. This I think that’s what it looked like when I look at it’s a picture. You put mounts on here and do your second third axis and then you’d be fine um.
So yes, pretty much it so, as you can see, I have number 34 on here and I’m going to take the clear I. Don’t know if you guys can see this. This is like a clear film and you put on it so like just in case I get rains or whatever you know, you’re psyched it’ll still be fine and, as you can see, I had a little bit of overlap on the bottom piece of my site right here and I just tucked it under, and it should be fine.
So, when I loosen this up and put this clear, put this clear, I’m a film over it all right. So this is correct and hhas not ripping me off. I should be sited in from 0 to 60 yards or I mean from love 0 from 20 to 70 yards I should be set up, ready to go um now, I’ll be honest with you guys. I bought this site and a pinch because I was going to go to I was invited to go to a 3d shoot. My friends and I actually do have my other site that I was planning on using I was going to using this site because I like singleton mover sites and whatnot.
This one is the trophy ridge version. Well this and actually was going to be using this. However, as you can see, there super glue right there. I was practicing and you know the bubble level came flying off, so um yeah I’ve decided to no not go out and lose arrows. So I went out I bumped this $105 site in a pinch, and you know, I mean for me I’m a very exact person. It took me four days to you, know stuff dialed in and ready to go because I want to be exact and no one really likes to miss and neither do I so guys.
If you enjoyed this. This is probably just going to be like a target site for me. Cuz. My new hunting site that re I’m ordered is the UM. The Montana black gold ascent to repin and I’ll, be picking that up later this week, I my pro shop along with more arrows. Because, honestly, if you don’t have second third axes, adjustment German, you guys are really missing out, because this windage and elevation like this windage like I, don’t like how you know the windage is and when my home elbow vertical, like the bubble is not level when I love my bubble.
I shoot way too far to the right, so yeah I’ll be getting a new site this week and I’ll be doing a review and setup of that site. So yeah guys, if you guys enjoyed this, please rate comment subscribe and until next time guys I will see you later. Peace.
Hi I’m Scott Bakken, with HHA sports, and today we have a brand new optimizer ultra just mounted to our Bowl and we’re now we’re going to work on sighting it. In the first thing, you’ll notice, when you mount the optimizer ultra to your bowl, is that you actually get two choices of mounting holes. You have a set of holes are a little bit farther forward on the site, and a set of holes are a little bit farther back.
This is all personal preference on where you want to mount your site. It’s basically just choosing. If you want your site a little bit farther out from your bowl or if you like it closer in I, prefer mine a little bit farther out. So I mounted my site on the back two holes so now that we have the site mounted we’re going to get our first yardage mark.
So what the optimizer ultra you get two options for, siting it in and picking out your pre-printed yardage tape. Your first option is to shoot 20 and 60, so shooting 20 yards and 60 yards and getting your yardage tape. That way, that’s the preferred method, because once you do 20 and 60, then that you’re going to use that exact tape number or you can shoot 20 yards and 40 yards and take that number and then go to a conversion chart.
That’s the way we’re going to do it. Today we have a little bit of wind today, so shooting a little bit longer distances is going to be a little difficult, so we’re going to do the 20 and 40 method, but you can do 20 and 60, so our first shot is going to be at 20 yards here. I have my dial on my ultra turned down to about Mark 10, and this is just a sheer guess.
You know we’re lucky. We have a pretty big target to shoot at, so we have some some room to play with, but I’m going to start at mark 10 and see where we go from there. That first shot was pretty high. So what I’m going to do now is I’m going to move my dial from mark 10 and I’m going to go because we’re about foot high I’m going to go down to probably about mark 3 and see where my next Harrow arrow hits.
It’s still a little high, so I’m going to move my dial all the way down to zero all right. So we shot our first round of arrows and we were shooting pretty high and when adjusting our dial, we actually ran out of room on our dial to bring our arrows down. So zero is the bottom of the dial and we were at zero and we were still shooting too high.
So we actually had to go in and move our scope, pausing up a set of holes to help bring the arrows down. So now that we made those adjustments, we’re going to start off again, but this time I’m going to start my dial at about mark number, five just to see where that hits. So we started out at 10 with our school pausing down and now that we moved it up, we’re going to start at 5 and then see you see from there.
So the first arrow is pretty much right in there. It’s a little bit to the left, but up and down looks pretty good, so to compensate for the left and right we’re going to loosen up our Micra windage and since we’re shooting a hair left I’m going to bring the skull pausing in to the left. So you always chase the arrow so I’m going to make just a few clicks to bring it in and one click is about an eighth inch at 20 yards.
So I don’t need to make much of an adjustment. Just a little one. Tighten our lock knob down. Okay, it’s pretty much! The same spot shoot one more just to okay, so we’re still still just a hair low until left, so I’m going to make the necessary adjustments and then we’ll go from there. So we just got done shooting at 20 yards and we made some minor adjustments and it turns out that our 20 yard mark on our dial is that mark number 8.
So you can either mark that on your tape or make mental note of it that 20 yards is that mark number 8, so we’re at 40 yards right now and I’m going to move my adjustment dial to I’m, going to try number 25 and see where that gets me. So you know you could go 20 30 40 and get your 40-yard mark that way, but we’re just going to try mark number 25 and see where that gets us that one looked pretty good, we’ll run down and take a quick look and see if we need to make any adjustments from there.
Now that we have our optimizer ultra shot in at 20 yards and 40 yards. We have the two marks on our setup tape that we need in order to find the correct, pre-printed, yardage tape that will have a sighted in from 20 yards all the way out to 80 yards. So at 20 yards we were at mark number. Eight and at 40 yards we are at mark number 25. So if you take 8 from 25 that gives you number 17 we’re going to take number 17 and look it up on the conversion chart that comes with your optimizer ultra.
So if you look at 17 right across from that, it’s going to reference number 38 number 38 is our final tape number that we need to lay down on our ultra speed dial. So in our package of pre-printed site tapes that comes with your ultra we’re going to find tape. Number 38, so we’re going to take number 38 we’re going to match our 40-yard mark on our yardage tape, with our 40-yard mark on our setup tape, lay the tape down and now our altro be sited in from 20 to 80 yards by the individual yard.
So now that we’ve successfully laid down our correct yard of tape on our optimizer ultra, we are sited in from 20 yards all the way up to 80 yards by the individual yard, I’m Scott, with HHA sports for more information, instructional videos or product videos visit us at h, h, a sports comm or visit us on social media at facebook, Instagram and Twitter.
Look at the HHA optimizer tetra site. Now this is a site that was released earlier this year at the ATA show I’ve had one on my bow for a couple of months now, I just wanted to give you guys kind of an overview of what this site is and what some of the features are. So if you’re familiar with HHA they’ve been the leader in single pin adjustable site technology for many many years now, a couple years ago they came out with the king pin, which was their first wheel forward design and what that did for you was it eliminated some of the issues that people had with mounting their quiver with the original optimizers that either had the slider or had the dial here at the back right.
So with the wheel forward, design, you’ve eliminated all issues with you know, quivers mounting on your bow, so the Tetra is going to be kind of the second generation wheel forward design and I think of it, kind of as a little brother to the king pin right. The king pin is still the flagship model for ajj. It’s their top of the line model features a lot of great technologies on it, but the Tetra also has some great technologies and some new stuff that the king pin doesn’t have.
So you know the biggest difference that I find between the king pin and the Tetra is that the Tetra does not have the removable wheel system that the king pin has this wheel is fixed in place. Now, that’s not a big deal for most people that are only shooting a single arrow setup, but having that removable wheel on the king pin is nice if you’re the type of person that likes to shoot multiple arrow setups, maybe you like to shoot one for 3d one for hunting, maybe in my case I like to shoot one for turkey hunting and then one for deer hunting I shoot different arrows, which has allows me to easily just remove the wheel.
That’s got the correct tape on it. For let’s say my turkey set up and put my deer set up on, you do lose that ability with the Tetra but like I, said for most people, not that big of an issue they did redesign the wheel on the Tetra. So it’s actually got this new shape. That’s a little bit easier to grab it’s not a round wheel like the kingpin has so a little bit easier to grab.
It’s got the same easy system where you just loosen this wing nut here and then you can adjust your sight up and down. So that’s probably the biggest difference between the two sights a couple of new things that they changed on the tetras they’ve got an all-new micro adjust system on the front, so I’m not gonna, loosen this and play with it right now, because this is my hunting bow I’m, getting ready to go.
Hunt tonight and I don’t want to mess with my sight in terms of my windage adjustment. But what you would do is loosen this up and then you can move the entire gang in and out so there’s a little bit better gang adjustment, meaning you can move it in bulk and then you use the wheel here for your fine adjustments in and out so actually they have changed that between the kingpin and the Tetra.
The other thing that changed on this particular rest is going to be the way that you can move and this what they’re calling their infinite adjustment on the actual scope where the scope housing mounts into the site bracket, so you’ll, see here on the side. You’ve got some witness marks that are laser etched into the site itself, so I’ll give you guys kind of just a quick look at how this site goes together.
So when you get it, you know in the box, that’s going to come in two pieces. You’re gonna need to assemble it. It’s super super easy. Alright, so you’ve got all your mounting hardware, all of your instructions and your tapes and everything are in here, but you’ve got essentially your sight bracket here and then you’ve got your scope and your scope housing now the way that this works- and this has actually got a small rubber band on and when you get it to hold these kind of brass washers in here, but the way that this works is these brass washers are actually going to slide into the sight housing.
You can now slide this up and down so you’ve got this infinite adjustment, where it’s on the kingpin, the sight housing actually bolted into the bracket, and if you wanted to move it, you needed to take those bolts out and move it into a new location. So the Tetra is a little bit more versatile and in that regard, I know.
This is a big improvement. That I personally liked allows for some a little bit easier fine-tuning of the actual site itself. So this moves up and down and then once you get it kind of to where you want it, you go ahead and you tighten these down. That’s also going to be your second axis. Adjustment is right here, so this site, once you get it in, there is going to swivel kind of side to side to level.
Your second axis out, once you get everything put together. You’ve got three different mounting locations here. I generally prefer to mount my site as are away from my boat as possible, so I’m gonna use this back set of holes and then you’ve got a four set of holes here which allows you to mount your quiver bracket on there.
I’ve got a tight spot. Quiver mounted on here works great and no problems. So that’s kind of the overview of the Tetra. Again, it’s kind of a little brother to the kingpin. The cost is definitely a little bit less you’re, looking at starting it 269 on the tetra where’s, the kingpin starts at about 270 or I’m. Sorry 379, so you’re gonna save a little bit of money on the Tetra.
You don’t get quite all the features it is not available in a tournament edition. With the dovetail mount, it is only a fixed mount, it’s more of a hunting site. Those of you who are looking for a target site or want something where you can really get that eye relief, get your sight way out there. You’re definitely gonna want to still stick with the kingpin.
The last new thing, I’ll tell you about HHA changed for this year is going to be waterproof sight, tapes, which is a very much needed improvement in my opinion. So you know all of their sites are gonna, come with a bunch of tapes. I’m not gonna, go into how to cite in your single pin sight. There’s plenty of other videos on that, but once you figure out which tape you need all of the new tapes are now water-resistant.
So if they get wet in the rain snow sleet, whatever you may be, hunting in you don’t have to worry about your tape, falling apart and coming off. So that’s a look at the HHA optimizer tetra. If you guys want to learn more about it, you can go to HHA sports comm they’ve got all the information there. Of course, if you guys want to buy one of these sites, check them out, Lancaster archery has them in stock and ready to ship, and thanks for watching.


